

-
Posts
980 -
Joined
-
Last visited
-
Days Won
15
Content Type
Profiles
Forums
Calendar
Downloads
Gallery
Everything posted by JJ the Gardener
-
Natural Farming Inputs Introduction to Natural Farming LAB - Lactic Acid Bacteria FPJ - Fermented plant juice Seawater, Fermented Seawater, Bio Mineral Water Vinegar OHN - Oriental Herbal Nutrient WCA - Water Soluble Calcium WCAP - Water Soluble Calcium Phosphate FFJ - Fermented Fruit Juice FAA - Fish Amino Acids S.E.S. - Seed and Seedling Treatment IMO to IMO2 IMO 3 IMO 4 & Liquid IMO IMO 5 Preserving bacterial based inputs Inputs - Section 13 - IMO 5 IMO 5 is essentially taking a nitrogen rich source such as manure, compost, food scraps, bone meal for example and using IMO4 to break it down to a usable media that will not harm plants nor lose or lose as much nitrogen due to the nitrogen cycle compared to other traditional mainstream farming methods. Not only is IMO5 ideal for plants but also the environment. Chris Trump - How To IMO5 IMO 5 Ingredients IMO4 Nutrient rich material such as compost, food scraps, manure, bone meal, etc. FPJ 1:500 BRV 1:500 OHN 1:1000 SW 1:25 Humic acid 1:500 Water "approximately" 1GAL/25LB My wife and I met the base player of Deep Purple from when this song was made. I post in loving memory of my wife. IMO 5 Process How much moisture to add will vary depending on how dry or moist the IMO4 is. Create your IMO5 water solution Per gallon of water FPJ 1:500 BRV 1:500 OHN 1:1000 Sea Water 1:25 Humic acid 1:500 Mix the IMO4 and the compost, manure or whatever media you are using Make a divot into the middle of the mixed soil & added dry materials. Then mix in the IMO5 water solution Pour water solution into the divot. Mix very well and repeat until evenly mixed. Careful not to make too wet or the temperature will increase (130f to 140f temperature is too high). Manure and high nitrogen additions keep more dry than wet. Mix so the media holds slightly together but crumbles apart, it should not clump or hold its shape. In about 7 to 10 days the IMO5 will be ready to use. Application Use IMO-4 by top dressing the soil around plants and top dressing fields before planting. Chris Trump - How to apply IMO4 Why to Natural Farm “Farmers have lost their independent authority which they have in the farming techniques of the old days. Farmers became dependent in buying almost everything that they need in farming, and they just engaged in farming by role according to the program presented by the seller.” “I insist to recover the spirit of farmers. To achieve it is impossible until the exhilarated farming that farmers can recover subjectivity in the farming technique is realized.” “New vision of farming techniques is needed to recover the true nature of farming. There is a hidden possibility to realize a new vision in the ways that farmers make and apply which are necessary farming materials by making use of local materials actively.” Dr. Han Kyu Cho A word from us. Cultural Healing and Life has compiled this information in the hopes that it will help not just to grow high quality plants and trees but that we begin to heal the lands and soils and by working from the bottom of the food chain up can nutritionally begin to heal ourselves. We see the microorganisms as part of the food chain that proactively works to increase the mineral density of our food and thus we increase the brix levels of our plants and the health of our animals. In so doing, we can restore true nutritional health. It has been a pleasure compiling this and it is with respect and gratitude that I thank all those who were used in this compi`lation. Please support them directly. ~Cultural Healing and Life, JJ the Gardener. Credits Dr. Han Kyu Cho Chris Trump http://www.cgnfindia.com/index.html The School of Life Reggaeville - Natali Rize - One people Natural Farming Inputs Introduction to Natural Farming LAB - Lactic Acid Bacteria FPJ - Fermented plant juice Seawater, Fermented Seawater, Bio Mineral Water Vinegar OHN - Oriental Herbal Nutrient WCA - Water Soluble Calcium WCAP - Water Soluble Calcium Phosphate FFJ - Fermented Fruit Juice FAA - Fish Amino Acids S.E.S. - Seed and Seedling Treatment IMO to IMO2 IMO 3 IMO 4 & Liquid IMO IMO 5 Preserving bacterial based inputs ~ A Cultural Healing and Life Compilation
-
Natural Farming Inputs Introduction to Natural Farming LAB - Lactic Acid Bacteria FPJ - Fermented plant juice Seawater, Fermented Seawater, Bio Mineral Water Vinegar OHN - Oriental Herbal Nutrient WCA - Water Soluble Calcium WCAP - Water Soluble Calcium Phosphate FFJ - Fermented Fruit Juice FAA - Fish Amino Acids S.E.S. - Seed and Seedling Treatment IMO to IMO2 IMO 3 IMO 4 & Liquid IMO IMO 5 Preserving bacterial based inputs Inputs - Section 12 IMO 4 & Liquid IMO Korean Natural Farming How to : IMO 4 Chris Trump - Korean Natural Farming How to : IMO 4 IMO 4 Mixing should be done on the soil floor and not on concrete in a heap of this mixture not more than 20 cm in height. Mix 1 part IMO 3 to 1 parts rice bran Now mix one part IMO 3 with one part soil. 50% of the soil should be from the crop field and 50% should be from fresh new soil (mountain soil, red fine clay, etc). Mixing the soils will harmonize the imo and soils. To control moisture "best practice" using natural farming inputs. When needed, control moisture with Natural Farming inputs such as FPJ, FFJ, FAA, Lab, Sea Water. Ratio of 1:1000 dilution with diluted seawater. It is necessary to add sea water for the IMOs to work best, when they are inoculated to the soil. Keep the mixture covered for two days. The end product is called IMO- 4. Pro Kashi IMO 3-4 Video, very good video showing how to know when it is done. Click for emoji for video HOW TO STORE IMO- 4 Moisture may be evaporated during storage. Adjust the moisture content to 65-70% by adding nutrient liquids of natural farming inputs just before using IMO-4. Application Use IMO-4 by top dressing the soil around plants and top dressing fields before planting. Chris Trump - How to apply IMO4 HOW TO UTILIZE IMOs In order to be effective, IMOs should be used in a proper manner. Use IMOs continuously. Since IMOs are used to make soil fertile and healthy, these should be collected and prepared every year. In order to bring about continued results. IMOs must be maintained in the soil. Maintain IMO diversity. Avoid being choosy in collecting microorganisms. Instead, microorganisms from different environments should be collected and mixed. It is recommended to collect IMOs from all four directions of the field. We can also collect microbes from mountain, summit, valley and trench. To obtain strong microbes obtain from areas that has distinct environmental conditions. For example, the sunny side of the field will have different IMOs from the shaded side. Altitude will also affect the variety of microorganisms at every level. To include "tough guys" into the IMO mixture, samples from the high mountains or uncontaminated regions can also be collected. Liquid IMO Chris Trump - How to Liquid IMO with Chris Trump Ingredient list for LIMO: IMO3 or Imo2 or IMO4 can also be used. FPJ 1:500 BRV 1:500 OHN 1:1000 SW 1:25 (1:20 is ok too) Humic acid 1:500 (optional) Fulvic acid 1:2000 (optional) Brown sugar 1:1500 (by volume, optional) Water (non-chlorinated) Liquid cultures of IMOs is similar to brewing a compost tea. Fill a pair of fine net bag with IMO3. Pantyhose Paint strainer bag Room temperature of around 20 degrees C and a PH between 6 and 7 is sufficient. You will then need a 250L opaque container with an air compressor. Add inputs at 0.5L Lactic Acid Bacteria (LAB), 2L Fermented Plant Juice (FPJ), 700-800 grams of brown sugar to 150-160L of water. Turn on air pump and and put the IMO 3 in the solution. Making IMOs and making actively aerated compost teas are similar but the main differences seem to be the source materials and the IMO fermentation process as opposed to composting. Depending on the the culture temperature the fermentation process takes between 5 and 7 days in Spring and Fall and 10 and 30 days in winter. Depending on the cultivated state the resultant mixture can smell either sweet or nasty, Sweet smell is desirable. Often a sludge will appear on the surface. This sludge is composed of microorganism corpses. This can occur when food or air is lacking in the solution. If it occurs add more air, and/or add more FPJ. Replacing the IMO in the sack every once in a while can also be beneficial. Compost removed IMO 3 Refill the tank with water while adding more food for microorganisms. The basic dilution is 1000 times, but can be as strong as 500 times depending on the need. Regular Dilute rate is 1:1000 with water when using. Using LIMO Use the same way you would a compost tea or garden tea. Foliar spray or with treat soil before planting or anytime you need to increase the biology. Additional, you can utilize chemical fertilizers and liquid IMO. Chemical fertilizer can be added to the solution. The solution can then be used 7-10 days later after the IMO has had time to act on the chemicals. Adding too much chemical fertilizer at once can stop the fermentation process. Introduce the chemical fertilizer to the tank in adequate amounts slowly. The yeast bacteria abundant in FPJ are excellent decomposers of chemical fertilizers converting them to easily absorbable mineral forms. Using chemical fertilizer in this way will greatly reduce soil degradation and the nutrients will also be better absorbed by plants. To duplicate the effect of nitrogen use ammonium sulphate or urea. To duplicate the effects of phosphorus, use superphospate or double superphospate. To duplicate the effects of calcium use quick lime. Credits Chris Trump http://www.cgnfindia.com/imos.html http://www.kswcd.org/conference/Dr Hoon Park III - Indigenous Microorganism(IMO).pdf https://rooftopecology.wordpress.com Natural Farming Inputs Introduction to Natural Farming LAB - Lactic Acid Bacteria FPJ - Fermented plant juice Seawater, Fermented Seawater, Bio Mineral Water Vinegar OHN - Oriental Herbal Nutrient WCA - Water Soluble Calcium WCAP - Water Soluble Calcium Phosphate FFJ - Fermented Fruit Juice FAA - Fish Amino Acids S.E.S. - Seed and Seedling Treatment IMO to IMO2 IMO 3 IMO 4 & Liquid IMO IMO 5 Preserving bacterial based inputs ~ A Cultural Healing and Life Compilation
-
 Americans paying more in taxes than for food, clothing By Brooke SingmanPublished August 31, 2017 Fox News Source: http://www.foxnews.com/politics/2017/08/31/americans-paying-more-in-taxes-than-for-food-clothing.html Americans spent more money on taxes than they did on food and clothing last year, according to data released earlier this week. In an assessment of “Consumer Expenditures” for 2016, the Bureau of Labor Statistics showed the average bill for federal, state and local taxes was $10,489. By comparison, Americans spent $9,006 on food and clothes, with most of that going toward food. CNSNews.com first pointed out the findings. While it may not come as a surprise that American households are shelling out to Uncle Sam, the data showed that bill has risen sharply in recent years -- the average tax bill rose 41 percent overall since 2013. According to the BLS, federal income taxes rose from $5,743 to $8,367 in that period. State and local income taxes rose from $1,629 to $2,046. The stats come as President Trump prepares to pressure Congress to pass tax reform. In a Missouri speech on Wednesday, he called for simplifying the system and lowering rates. "This enormous complexity is very unfair," the president said. "It disadvantages ordinary Americans who don’t have an army of accountants while benefiting deep-pocketed special interests." According to BLS, the largest expense for Americans in 2016 was on “housing,” costing an average consumer unit $18,886 during the year. Brooke Singman is a Politics Reporter for Fox News. Follow her on Twitter at @brookefoxnews.
 -
Natural Farming Inputs Introduction to Natural Farming LAB - Lactic Acid Bacteria FPJ - Fermented plant juice Seawater, Fermented Seawater, Bio Mineral Water Vinegar OHN - Oriental Herbal Nutrient WCA - Water Soluble Calcium WCAP - Water Soluble Calcium Phosphate FFJ - Fermented Fruit Juice FAA - Fish Amino Acids S.E.S. - Seed and Seedling Treatment IMO to IMO2 IMO 3 IMO 4 & Liquid IMO IMO 5 Preserving bacterial based inputs Inputs - Section 11 IMO 3 Cultivated Indigenous Microorganisms IMO 3 is essentially a concentrated stock of cultivated indigenous microorganisms that is then placed into a dormancy state that can be furthered processed into liquid IMO and imo 4. IMO 3 with Chris Trump Chris Trump - IMO #3 (part 1) with Chris Trump. This is a short video about the finishing/end day of IMO #3. If you using this method then this is a great little informative section on what IMO3 looks like as it finishes. By Chris Trump. Chris Trump - How to : IMO 3 (Part 2) with Chris Trump Materials for IMO 3 IMO2 Rice bran or similar media on which the microbes will grow FPJ 1:500 BRV 1:500 OHN 1:1000 SW (sea or mineral water) 1:30 Humic acid 1:500 Water (non-chlorinated) approximately 1GAL/25LB IMO 3 Method Dilute IMO-2 with water (1:1000) and mix with rice bran or flour. Use diluted natural farming inputs such as FPJ, FAA, OHN, plus some humic acid while adding water. After evenly mixing with diluted IMO-2 This process is very important and must be done on a soil floor and not on a concrete floor and in a place with good ventilation. As time passes, the temperature rises within the pile of the rice bran mixture, because it undergoes fermentation. On a dirt floor make a heap 13-15 inches (30 to 40 cm) height, and cover it with straw, straw mat or leaf litter to prevent moisture evaporation and to provide shade from direct sunlight. 70% shade and 30% light is recommended, since it creates favorable conditions for useful microbes in paddy straw, Microorganisms such as Aspergillus’s oryzae, Bacillus subtilis, etc. Be sure to press several spots with weights or soils over the straw, This is due to straw being too light to be fixed on the top of the rice bran mixture. It is best to use straw mats or straw bags (gunny bags) for covering. The moisture level can be measured by forming a rice bran ball and twisting it. If the moisture level is around 65 -70 % the ball can be easily divided into two halves. However, it is better to use the moisture meter (hygrometer) to get accurate data. When the temperature reaches 40-50 °C Turnover the rice bran mixture evenly so that the temperature does not rise further and also in order to prevent moist clusters. If the temperature is below 40 °C, The mixture may be in an anaerobic condition due to the excessive moisture. If the temperature rises up above 70 °C, Proteins may be broken down by thermophilic microbes and nutrients released into the air resulting in loss of fertilizer effect. Turn over the rice bran mixture in order to control temperature. It takes about 7 days for this process. Cultivation speed can vary depending on the outside temperature, but it usually takes 5-7 days for the surface to be covered with whitish IMO spores. When the temperature stops rising the fermentation process is finished and you have IMO3. Chris Trump - IMO #3 with Chris Trump. Natural Farming on our farm. Storing IMO 3 Keep the IMO 3 bags in shaded and cool place. Make sure that the air is well circulated by keeping IMO-3 in a ventilated container such as jute / gunny / cloth bags. Spread rice straw or leaf litter at the bottom of the container, Place in IMO-3. During storage, the IMO-3 may become dry (moisture level 20-30%) as the moisture gets evaporated. It means that the IMO had entered a state of dormancy. Pile up containers into 3 layers and shield them from direct sunlight and rain. At this point, there is no need to turn over, because of the convection currents that are created through the gaps of containers. Can be stored for 6 months to a year. Credits Chris Trump https://rooftopecology.wordpress.com http://www.cgnfindia.com/imos.html http://www.kswcd.org/conference/Dr Hoon Park III - Indigenous Microorganism(IMO).pdf The School of Life The Revivalists Natural Farming Inputs Introduction to Natural Farming LAB - Lactic Acid Bacteria FPJ - Fermented plant juice Seawater, Fermented Seawater, Bio Mineral Water Vinegar OHN - Oriental Herbal Nutrient WCA - Water Soluble Calcium WCAP - Water Soluble Calcium Phosphate FFJ - Fermented Fruit Juice FAA - Fish Amino Acids S.E.S. - Seed and Seedling Treatment IMO to IMO2 IMO 3 IMO 4 & Liquid IMO IMO 5 Preserving bacterial based inputs ~ A Proud Cultural Healing and Life Compilation
-
Natural Farming Inputs Introduction to Natural Farming LAB - Lactic Acid Bacteria FPJ - Fermented plant juice Seawater, Fermented Seawater, Bio Mineral Water Vinegar OHN - Oriental Herbal Nutrient WCA - Water Soluble Calcium WCAP - Water Soluble Calcium Phosphate FFJ - Fermented Fruit Juice FAA - Fish Amino Acids S.E.S. - Seed and Seedling Treatment IMO to IMO2 IMO 3 IMO 4 & Liquid IMO IMO 5 Preserving bacterial based inputs Inputs - Section 10 IMO - Cultivated Indigenous Microorganisms Natural farming is based around creating a soil environment and healthy microbiology which enables the Microorganisms to play an important role in making quality soil for growing plants. These microorganisms can also be collected and cultured. EnigmaVEVO - Enigma - Return To Innocence Microorganisms have two major functions in farming Microorganisms decompose complex organic compounds such as dead bodies of plants and animals and wastes into nutrients, making them easily absorbed by plants. They can create compounds such as antibiotic substances, enzymes and lactic acids that can suppress various diseases and promote healthy soil conditions. Act as a catalysis for natural chemical processes in the soil. IMOs are used primarily to create fertile and healthy soil condition that is ideal for farming and to prevent plant diseases. In Natural Farming, IMOs are used in treatments applied to the soil in order to improve its fertility and health. By collecting and making IMO's we can create not just healthy growing media but also heal sick land and begin to restore nature at its core. All about IMO by Chris Trump Chris Trump - All about IMO Cho Global Natural Farming(CGNF) - Dr. Hoon Park PDF - IMO from University of Hawaii Indigenous Microorganisms: Grow Your Own Beneficial Indigenous Microorganisms and Bionutrients In Natural Farming Dear Future Generations, Sorry Gabriel Greiner - Dear Future Generations, Sorry. About collecting IMO Indigenous microorganisms from the environment Natural farming promotes the use of Indigenous Microorganisms (IMOs). The microorganisms that have been living in the local area for a long time are best for farming because they are very powerful and effective. They have survived and can survive the extreme climatic conditions of the local environment much better than artificially produced microorganisms Microorganisms (microbes) may be cultured at any time of the year; however, avoid wet, rainy seasons. The collection process takes approximately 7–10 days in cooler weather (Below 68°F, 20°C) and 3–4 days under warmer conditions ( above 68°F, 20°C). Organisms that are found under the heat of the sun are largely different than those found in shaded areas such as under the bamboo trees. Dr. Cho advocates that it is better to culture microorganisms from different areas in order to collect different kinds of microorganisms. Beneficial microbes are highly concentrated under undisturbed forests or other vegetated areas. Combining microbes collected from multiple sites will likely result in a more robust culture. It is also good to culture microorganisms at different weather conditions and to mix different types of microorganisms. It will take 3 days in summer and 5 days in winter. Black molds on the steamed rice indicate that you have exceeded the number of days. The collected IMO should smell like yeast. Excellent illustration and overview of collection & making of IMO 1 and 2, the videos below are more detail. Chris Trump - How to: IMO 1 and 2 on our farm Selecting collection sites Collect from a variety of sources and areas, going higher up in elevation from the planting area. This works to ensure that you are collecting stronger microbiology. Select areas in forests and fields. Old trees Old areas of growth. Areas of good mycelium growth. Collecting from sites that are not nutritionally rich is better than high nutrient areas. This is how to collect stronger microorganisms as only the stronger microbes can survive those areas. Collect near the roots of bamboo and leaf molds from broad leaf trees and plants. Leaf molds showing white hypha. Avoid places of regular human activity. Secluded areas are best. The idea of taking from famous sites may not be an ideal location if the microbiology is not healthy and strong. Select locations for merit only. Making of a collection box Made of Wood or Bamboo is recommended, preferably made of cedar. A small wooden/bamboo box, 12 x 12 x 4 inches deep. Cedar is preferred as it helps against pest. Ensure small holes or gaps on the bottom to promote microbiology ease to rice. Collection Box Building videos KNF Journey Special thanks for not just illustrating how to build the IMO box but also stressing tool safety! Guardeners of the Land - IMO box build How to: IMO 1 Chris Trump - How to: IMO 1 IMO Collection Process Fill the wooden box with 3 inches of steamed rice. Prime the rice (optional) Add 1ml of OHN and 2ml of FPJ Ensure rice is not overly wet but more not quite done or harder. Allows adequate air supply by not stuffing the rice higher than 3 inches. Excessive moisture promotes growth of fungi that are less desirable for the intended uses. Fill rice half way with rice. Cover the box with white paper towel, being careful not to let the towel touch the rice. There should be at least an inch or so of air space between the rice the paper towel. Loosely place rice in the box ensuring not to press the rice hard into the box. Without sufficient supply of air, the anaerobic IMOs will get collected. Use rubber bands around the top of the box to secure the paper towel in place. Label date and area collected. Cover the top of the box with wire screen to prevent animals from tampering with the rice. Top the wire with a sheet of clear plastic to protect the box from rain, and place it under trees or in another secluded area. The box should not be in direct sunlight or water. Cover with leaves or plastic. Mark an area 12 inches x 8 inches in the soil and make a 2 inch pit into the soil. Place the rice-filled wooden box in this pit, where IMOs abound, such as in a forest and/or field or at the site where many decomposed leaf molds are found. Cover the box with leaves. Cover the box with fallen leaves from the harvest location. Anchor the plastic sheet on all sides with small rocks to prevent it from being dislodged by wind. Leave the box undisturbed for a minimum of 4–5 days. After that time, check to see whether the moist rice is covered with white mold. It will take 3 days in hot summer and 5 days during cooler time periods. If mold growth is sparse, re-cover the box and wait an additional 2–3 days before re-checking. If the mold is a color other than white (other colors indicate growth of less effective fungi). Multi colors are normal and usable. You want to more white and grey like with spider web or cotton candy growth is ideal. Collected IMO should smell like yeast. If rain has entered the box, the contents should be discarded and the process repeated. Black molds on the steamed rice indicate that you have exceeded the number of days How to make IMO2 by Chris Trump Chris Trump - How to: IMO2 Culturing and making IMO 2 Once collected this is referred to IM01. The next step is to culture and increase the population of this collection of Indigenous Microorganisms and create IMO2. Materials to use: A clean clay pot (hard-fired, glazed, or terra cotta) A wooden spoon white paper towels rubber bands A large clear bowl, big enough to hold contents of rice mixture A small food scale A straw mat A shovel A composting thermometer Raw, granulated brown sugar is advisable, but crude and unrefined sugar (jaggery) is better. The closer the state of sugar is to nature, the better. The less process the sugar has undergone, the more effective it is. Therefore, white refined sugar is not recommended. Wheat mill run* or, if available, mushroom growth medium waste. Mixing Process Tare the scale for the mixing jar. Weigh the filled bowl and calculate the weight of the rice mass by subtracting the weight of the empty bowl from the filled bowl. Weight out equal amounts of sugar to the amount of molded rice. The use of sugar is used for osmotic pressure and not as a food source. Gradually mix 1 to 1 with sugar or Jaggery. You can mix IMO collections. Diversity is a strength in natural farming. This will put the microbes into a dormant state for later use. Hand knead and massage, not smashing hard the sugar and rice until the material has the consistency of gooey molasses. It is ok to mix in more brown sugar if the mix is too wet. If it starts to bubble you have lost quality and will not be as effective. This is from being too wet and it started to ferment. Place the mixture in jar 2/3 full. Use the wooden spoon to move the molded rice into the jar. The 1/2 air space is necessary for the process. Clean the top of the container with vinegar. Cover it with paper towel secured in place with rubber bands. Store the pot in a cool area away from direct sunlight for 7 days. This will allow the mixture to ferment. Working in a shaded area: Add a small amount of water to the fermented rice mixture in a 1:500 ratio. Then, slowly blend in wheat mill run (or used mushroom medium) until mixture is of semi-moist but not wet consistency 65–70% moisture content of the media mixture. Place a mound of the mixture on a soil surface and cover it. Use a tarp, straw mat or leaves, protecting it from sunlight. Allow the microbes to propagate for 7 days. Periodically examine the external surface of the pile for white mold growth, monitor internal temperature of the pile with a composting thermometer so as not to exceed 122°F (50°C), Turn the pile with a shovel (a minimum of three to four times during the week) to keep fermentation temperatures from getting too high. When the fermentation process is finished, internal temperature will stabilize, indicating cultivation is complete and ready to use. Application and use This biological soil amendment is expected to enhance soil microorganism activity. This is a concentrated inoculate. Dilute the final product (1 to 1 by volume) with soil and incorporate this mixture into the surface soil as a topdressing for crop production, Add it to your compost pile. Further processing into into IMO3. Congratulations for learning about IMO 1 & 2 Credits EnigmaVEVO Chris Trump KNF Journey Guardeners of the Land Gabriel Greiner Cho Global Natural Farming(CGNF) University of Hawaii Gil A. Carandang Herbana Farms Burol, Calamba City Laguna, Philippines Natural Farming Inputs Introduction to Natural Farming LAB - Lactic Acid Bacteria FPJ - Fermented plant juice Seawater, Fermented Seawater, Bio Mineral Water Vinegar OHN - Oriental Herbal Nutrient WCA - Water Soluble Calcium WCAP - Water Soluble Calcium Phosphate FFJ - Fermented Fruit Juice FAA - Fish Amino Acids S.E.S. - Seed and Seedling Treatment IMO to IMO2 IMO 3 IMO 4 & Liquid IMO IMO 5 Preserving bacterial based inputs ~ A Proud Cultural Healing and Life Compilation
-
Natural Farming Inputs Introduction to Natural Farming LAB - Lactic Acid Bacteria FPJ - Fermented plant juice Seawater, Fermented Seawater, Bio Mineral Water Vinegar OHN - Oriental Herbal Nutrient WCA - Water Soluble Calcium WCAP - Water Soluble Calcium Phosphate FFJ - Fermented Fruit Juice FAA - Fish Amino Acids S.E.S. - Seed and Seedling Treatment IMO to IMO2 IMO 3 IMO 4 & Liquid IMO IMO 5 Preserving bacterial based inputs Inputs - Section 9 S.E.S. - Seed and Seedling Treatment Reggaeville - Sistah Awa - Roots and Culture About S.E.S. By utilizing vinegar, OHN and FPJ at the right ratios and soaking for effective periods of time based on seed size and germination period (short, medium and long) the natural farming input seed and seedling treatment (SES) will work to ensure that planted seeds and transplanted trees and bushes start off with strong vigor and a healthy start. This solution is extremely powerful. The difference in seed shape as well as root development and in leaf thickness is easily visible. Chris Trump video on S.E.S. Chris Trump - How To: Seed Treatment Solution S.E.S. Materials Vinegar Brown rice vinegar or apple cider vinegar is typical but any fermented vinegar can be used. Helps break up the cotyledon FPJ Is used to add heath and vigor. OHN Is used for good redevelopment and pest resistance. Water A mineral rich water is ideal or a diluted seawater. Regular water without chlorine is fine. Instruction for making SES. Mix together the vinegar and FPJ with water at a dilution of 1 to 500. Mix OHN with water at a rate of 1 to 1000. The dilution rate is weaker than vinegar and FPJ. If you have year old OHN dilute a bit more as OHN strengthens over time. Once mixed, you can store SES in a sealed jar until ready to use. Store out of direct sunlight. Instruction for seeds Soak seeds by size and time of germination. Seeds which germinate quickly (turnip, chinese cabbage, bean) should be soaked for 10 minutes to two hours; Seeds which germinate more slowly (cucumber, melon, squash, lotus) should be soaked for 20 minutes to four hours. Seeds which germinate very slowly (rice, barley, tomato) should be soaked for 30 minutes to 7 hours. A half to one hour is sufficient for potatoes, ginger, taro and garlic. Plant the seeds while wet and do not allow to dry. Instruction for Seedlings and potted plants. In 3 liters of water mix 2 tablespoons of vinegar, 2 tablespoons of FPJ and 2 tablespoons of OHN. OHN is higher as the plants are seedlings or established plants rather than seed. Before transplanting seedlings do not water for 2 days. Remove dirt by gently shaking, try not to damage the roots. You can also rinse the soil off from roots. Tree transplants, remove any dirt. Can use water to rings soil away. Allow roots to dry two days. This ensures the plant will strongly uptake the SES solution. Soak for desired time. Put in a container and soak the seedlings for 15 seconds. Immediately transplant the seedlings. The seeds will develop thick cotyledons making it immune to worms. They will also have good root development making them resistant to diseases. Foliar spray the remaining mixture on plants after they are transplanted. Credits Chris Trump https://rooftopecology.wordpress.com http://www.cgnfindia.com/index.html The School of Life Reggaeville - Sistah Awa Congratulations for learning about S.E.S. Natural Farming Inputs Introduction to Natural Farming LAB - Lactic Acid Bacteria FPJ - Fermented plant juice Seawater, Fermented Seawater, Bio Mineral Water Vinegar OHN - Oriental Herbal Nutrient WCA - Water Soluble Calcium WCAP - Water Soluble Calcium Phosphate FFJ - Fermented Fruit Juice FAA - Fish Amino Acids S.E.S. - Seed and Seedling Treatment IMO to IMO2 IMO 3 IMO 4 & Liquid IMO IMO 5 Preserving bacterial based inputs ~A Cultural Healing and Life Compilation
-
Natural Farming Inputs Introduction to Natural Farming LAB - Lactic Acid Bacteria FPJ - Fermented plant juice Seawater, Fermented Seawater, Bio Mineral Water Vinegar OHN - Oriental Herbal Nutrient WCA - Water Soluble Calcium WCAP - Water Soluble Calcium Phosphate FFJ - Fermented Fruit Juice FAA - Fish Amino Acids S.E.S. - Seed and Seedling Treatment IMO to IMO2 IMO 3 IMO 4 & Liquid IMO IMO 5 Preserving bacterial based inputs Inputs - Section 8 - FAA - Fish Amino Acids The Fish Amino Acid (FAA) is a liquid made from fish and used largely in the vegetative state. FAA is of great value to both plants and microorganisms in their growth, because it contains and abundant amount of nutrients and various types of amino acids (will constitute a source of nitrogen (N) for plants). FAA is used in conjunction with other Natural Farming inputs and applied as either a light foliar mist or a soil drench to maximize uptake and minimize runoff or leaching, providing just enough N to the plant for optimum uptake and the production of chlorophyll to maintain plant health. PDF - University of Hawaii Videos of Fish Amino Acid FAA Recipe Chris Trump - FAA and Fermented Compost #Christrump #soilsmith #naturalfarming Korean Natural Farming How to: FAA Drake - CGNF Fish Amino Acid FAA recipe FAA video with great information Hybrid Agri - Hybrid Tutorial: How To Make FAA Fish Amino Acids for Organic Gardening Materials Fish trash (head, bone, intestine, etc.) Jagerry / Brown sugar / Molasses can be used. IMO-3 (for smell and to help dissolve fish fats) LAB (optional, for smell and to help dissolve fish fats) Mosquito net Rubber band / thread Clay pot / plastic jar (PE container) or glass jar Instructions Cut fish into pieces and put in a clay pot or plastic jar. Do not use hands. The smaller the pieces the easier it is to dissolve. All parts of fish are usable, tails, gills, guts, eggs, fins, heads, bones. Blue backed fish are best such as mackerels, sardines, skipjack tuna and similar. Place a layer of large rocks at the bottom to provide aeration, minor minerals, and an area where the liquids will collect during the fermentation process. Add Jagerry of an equal amount (1:1 weight ratio). Molasses can also be used. Brown Sugar. Fill the jar up to 2/3 of its volume. Add 2 to 3 tea spoons of IMO-4, and LAB to dissolve the fat. This will prevent a smell. Add a little OHN. Do not leave any fish exposed above the sugar. Cover the opening of jar with a breathable cover. After approximately 3 to 5 days, the fish waste will begin to break down and liquefy through fermentation and the osmotic pressure generated by the addition of brown sugar. However, the process takes 2 to 6 months to produce mature FAA that is ready to use. FAA, when completely fermented, will have a sweet, slightly fishy odor Big bubbles are indicative of a weak enzyme reaction. Small bubbles are indicative of a strong enzyme reaction. Drain and extract the solution. After small bubbles have stopped Bottle and store. Leave lid loose for two weeks as to prevent pressure build up and a sticky explosion. Store in a cool dry place out of direct sunlight. The remaining solids can be used to make IMO#5 or composted. Tips and use FAA is rich with nitrogen. It is good fertilizer for applying both to soil and foliage since it enhances the growth of crops during their vegetative growth period when used with other Natural Farming Materials. When making IMO or mixed compost apply the FAA after diluting it with water 1:1000 ratio. Then the FAA will help activate the micro organisms. For leafy vegetable, it is possible to use FAA continuously to increase yield and improve taste and fragrance. For leafy vegetables, spray weekly to improve yields, fragrance, and taste. Avoid spray applications during full sunlight hours to prevent foliar burning and evaporation of the solution before the plant has had a chance to absorb it. Do not use FAA during the reproductive growth stage as it may induce over growth and extend harvest dates. Put the bones left over from creating FAA into the brown rice vinegar (BRV). The bones will decompose and produce a quality water-soluble calcium phosphate. Blue, back color fishes will make ideal FAA as they have high amounts of amino acid). Mackerel FAA is very effective in getting rid of mites and the green house whitefly (Trialeurodes vaporariorum). Dilute FAA with water and spray it on both sides of the leaf. Do not use after the vegetative stage. The effects of FAA are more observable when mixed with a pinch of urea. Study on rice grown with Natural Farming Fish Amino Acids. Drake - ISNSF16 - Rice Growth w/ Fish Amino Acid - Julius Sugue Congrats for learning about FAA! Credits #Christrump #soilsmith #naturalfarming Drake Hybrid Agri https://www.ctahr.hawaii.edu/ Julius Sugue http://www.cgnfindia.com Monty Python The School of Life Natural Farming Inputs Introduction to Natural Farming LAB - Lactic Acid Bacteria FPJ - Fermented plant juice Seawater, Fermented Seawater, Bio Mineral Water Vinegar OHN - Oriental Herbal Nutrient WCA - Water Soluble Calcium WCAP - Water Soluble Calcium Phosphate FFJ - Fermented Fruit Juice FAA - Fish Amino Acids S.E.S. - Seed and Seedling Treatment IMO to IMO2 IMO 3 IMO 4 & Liquid IMO IMO 5 Preserving bacterial based inputs ~ A Cultural Healing and Life Compilation
-
Natural Farming Inputs Introduction to Natural Farming LAB - Lactic Acid Bacteria FPJ - Fermented plant juice Seawater, Fermented Seawater, Bio Mineral Water Vinegar OHN - Oriental Herbal Nutrient WCA - Water Soluble Calcium WCAP - Water Soluble Calcium Phosphate FFJ - Fermented Fruit Juice FAA - Fish Amino Acids S.E.S. - Seed and Seedling Treatment IMO to IMO2 IMO 3 IMO 4 & Liquid IMO IMO 5 Preserving bacterial based inputs Inputs - Section 7 Fermented Fruit Juice Fermented Fruit Juice or FFJ is is a water soluble potassium that is similarly made as Fermented Plant Juice (FPJ) but with fruit. FFJ is easily absorbed by the plants leaf. It is basically an artificial honey as a nutritional activation enzyme which promotes growth, helps maintain a bio friendly environment, and helps animal digestion. It is used to revitalize crops, livestock and for humans, as all natural farming input, it is edible. As the main fruit ingredients use sweet fruits such as Banana, Papaya, Mango, Grape, Melon, Apple etc (the fruits must be sweet and not tart or sour). However, only use citrus with other citrus plants. Different types of FFJ can be made for different periods of plant growth. You can make a change over FFJ from unripe fruit. For periods of main flowering you can use riper fruit and for end of crop you use matured end of harvest fruits. In this way you can tailor an FFJ for the properties that match your specific growth period. Aloha Terps - Korean Natural Farming - URBAN FORAGING FOR FFJ (fermented fruit juice) Instructions Suggested materials include banana, papaya, pineapple, mango, jack fruit, star fruit, guava, pumpkin, etc (use citrus with only citrus plants and grapes only with grapes due to their cold weather and sour characteristics). Recommended “best” mixture is banana 3 kg, papaya 3 kg, and pumpkin 3 kg. Potato, cassava, yam, matured squash and carrot can be substituted for fruit if needed. Make FFJ from each fruit separate and mix before use. ' Prepare at least 3 fully ripened fruits, either picked or fallen. If the quantity of fruits is not sufficient, you may add supplementary ingredients such as spinach roots, wild yam, cabbage, cucumber, zucchini and radish. (Use grapes only for grapes and citrus for citrus fruits. These fruits are not good when used on other crops due to their cold and sour characteristics.) Do not wash the fruit. Best time to prepare in the evening to prevent flying insect. Generally prepare 1 kilo fruits to 1 kilo brown sugar or in a 1 to 1 ratio Use half of the sugar while dicing and pour the remaining half after all of the fruits have been diced and placed in the container. In summer for 1 Kg of fruit ingredient, use 1.2 to 1.3 Kg of brown sugar (Jaggery) In winter use 1Kg each of fruit and brown sugar or in a 1 to 1 ratio. (One of the functions of brown sugar is to control moisture. During winter, temperature is lower, thus, there is little need to control the moisture). Spread the sugar on the chopping board. Dice your fruit ingredients starting with the ripest. After dicing, smear sugar on the fruits and put them in a container. This step should be taken quickly to prevent the loss of essential substances. Fruits that are difficult to dice like grapes and strawberries may be slightly crunched with clean fingers. Use half of the sugar while dicing and pour the remaining half after all of the fruits have been diced and placed in the container. Slowly stir the mixture of diced fruits and sugar, about 2 to 3 times with a wooden stick. Stir more in winter as temperature plays a role in this process. Stir less in summer as temperature plays a role in this process. Place in a jar and fill to 2/3 full leaving air for the fermentation to happen. Always leave 1/3 of the container or jar open so the organisms can breath. Let sit 7 to 10 days out of direct sunlight and bright light. When big bubbles pop during the fermentation process, it means the power of enzyme is weak. When tiny bubbles fiercely boil at once, it means power of enzyme is strong. After fermentation, sprinkle some more sugar on the mixture and store in a cool and shaded place. It is normal, that some sugar can still be found on the surface. When storing, leave the lid loosely on for 14 days to prevent an explosion from gasses. How and when to use For Plants: Apply using 2 tbsp of FFJ / 10 liters of water. Apply directly to leaves of plants when sun is not out. Add to the IMO and FPJ mixture and spray together to the leaves and soil of fruit bearing trees or during vegetative and reproductive stages. For Animals: Mix 2 tablespoons of the juice to 1 liter of water. This is also good for human consumption. Transition/Changeover period: During this period, crops require ample amounts of phosphoric acid. Acid from FFJs of less ripe fruits is good such as those from Papaya, Mulberry, Raspberry or grape. Only use grapes for grapes and citrus for citrus. Often used with other natural farming inputs. After the Changeover period of crops: Apply with FFJ that has been diluted in 1:1000 ratio in water. Reproductive growth period: FPJs made from fully ripened fruits of apple, banana, mango, papaya, peach, and grape are useful to supply the calcium demand of crops at this stage. Often use with WCA and other inputs. It is an excellent output for re-energizing crops and livestock. Spray it to chicken housing, vegetables, orchard for protection against diseases. FFJ made from Strawberries Nappy Valley Genetics #tastethenewbreed - Making nutrients Strawberry FFJ KNF Style. #breakawayfromthebottle A video of fermented fruit juice production UPOU Networks - Fermented Fruit Juice (Organic Agriculture) Credits Of Monsters and Men Aloha Terps Nappy Valley Genetics #tastethenewbreed UPOU Networks The School of Life Natural Farming Inputs Introduction to Natural Farming LAB - Lactic Acid Bacteria FPJ - Fermented plant juice Seawater, Fermented Seawater, Bio Mineral Water Vinegar OHN - Oriental Herbal Nutrient WCA - Water Soluble Calcium WCAP - Water Soluble Calcium Phosphate FFJ - Fermented Fruit Juice FAA - Fish Amino Acids S.E.S. - Seed and Seedling Treatment IMO to IMO2 IMO 3 IMO 4 & Liquid IMO IMO 5 Preserving bacterial based inputs ~A Cultural Healing and Life compilation
-
Natural Farming Inputs Introduction to Natural Farming LAB - Lactic Acid Bacteria FPJ - Fermented plant juice Seawater, Fermented Seawater, Bio Mineral Water Vinegar OHN - Oriental Herbal Nutrient WCA - Water Soluble Calcium WCAP - Water Soluble Calcium Phosphate FFJ - Fermented Fruit Juice FAA - Fish Amino Acids S.E.S. - Seed and Seedling Treatment IMO to IMO2 IMO 3 IMO 4 & Liquid IMO IMO 5 Preserving bacterial based inputs Inputs - Section 6 Water Soluble Calcium Phosphate (WCP) The Water-soluble Calcium Phosphate (WS-CaPo) is extracted from the bone of vertebrate animals. WS-CaPo is an essential substance for plant growth and is widely distributed in the soil. Calcium phosphate is insoluble in water, but soluble in acids: this property is used in Natural Farming. Calcium phosphate can dissolve slightly in the water containing CO2. WCP is great for building strength and for using during times of pregnancy. Video by OneDrive, he speaks on WCA and WCAP. He has so much information I recommend watching it if you have not. Video By Chris Trump and illustrates the bones very well. Chris Trump - How to WCAP Drake discusses calcium phosphate with other additional information. Drake - farmLife: water soluble calcium phosphate natural farming Instructions for WCP Ingredients Needed Animal bones 200 gms (Cow / Pig / Chicken/ fish) Brown Rice Vinegar 1 liter. (BRV) Clay Jar / Glass Jar Porous paper ( Paper towel) Rubber Band Ready the bones and remove all bits of food and leave only bone. (Pig, chicken and fish bones are common) Boil the bones and let dry in sunlight. Break the bone/shells into small pieces Lightly roast or grill the bone in a frying pan or foil container over low heat for approximately 45 minutes to remove any organic substances that will rot and contaminate the WCP. Bones should be dry burned black all the way through but not ashed or tanned from being under done. Should almost look like charcoal. Shells do not need cooked. Add the charred bone to a glass jar filled 2/3 full with brown rice vinegar, a store bought fermented vinegar will work just as well at a 1:10 ratio by weight. Vinegar should not be distilled. The vinegar and material will make carbon dioxide bubbles, while the calcium is being dissolved into the solution. Cover the mouth of the jar with breathable cloth, such as muslin, or paper (not plastic) and secure with rubber bands or ties to keep out pests. Place the jar out of sunlight and bright lights for 7 to 10 days. Letting it sit longer than needed will not hurt the WCAP. After this time, check if bubbles are present in the solution. If bubbles are not present, the WCP is “saturated” – proceed to step 10. If bubbles are present, add more roasted bones or shells and let stand for 1 to 2 more days. Repeat until the solution stops producing bubbles. Strain the vinegar-and-bone solution through a colander into a clean glass jar to remove eggshells. Label the WCP solution and store at room temperature out of direct sunlight. compost the remaining materials. Preparation of 1:1,000 WCP Solution Amount of WCP _____________________________________________________________ Water Volume Kitchen utensil measurements Fluid ounces (fl oz) Milliliters (ml) ¼ gallon 1 /3 teaspoon (tsp) 0.06 2 1 gallon ¾ tsp 0.13 4 5 gallons 1¼ tablespoons (Tbsp) 0.64 19 10 gallons 2½ Tbsp 1.28 38 25 gallons little less than ½ cup 3.2 95 50 gallons little more than ¾ cup 6.4 189 Applying and when to use WCP Apply WCP during the Change-over period. It promotes the differentiation of flower buds resulting in high fertility and yield. WCP improves the sugar content of fruits. Apply WCP when the colors of leaves turn light or dark green. WCP can easily travel within the plant and move to the vigorous new leaves first. As a result, symptoms of deficiency appear mainly on the petiole and veins of the old leaf. The new leaf does not grow well and it becomes smaller and dark green in color. The growth of flowers is noticeably suppressed, naturally bearing fewer fruits. The fruit skin becomes thick and the acid content increases. Dilution rate of 1:500 During transition stage. Using with pregnant animals. Dilution rate of 1:1000 when mixing with water soluble calcium inputs. Congratulations for learning about WCP Credits Onedrive Chris Trump Drake Run River North Reggaeville - Sistah Awa - Roots and Culture The School of Life Natural Farming Inputs Introduction to Natural Farming LAB - Lactic Acid Bacteria FPJ - Fermented plant juice Seawater, Fermented Seawater, Bio Mineral Water Vinegar OHN - Oriental Herbal Nutrient WCA - Water Soluble Calcium WCAP - Water Soluble Calcium Phosphate FFJ - Fermented Fruit Juice FAA - Fish Amino Acids S.E.S. - Seed and Seedling Treatment IMO to IMO2 IMO 3 IMO 4 & Liquid IMO IMO 5 Preserving bacterial based inputs ~cultural Healing and Life compilation
-
Natural Farming Inputs Introduction to Natural Farming LAB - Lactic Acid Bacteria FPJ - Fermented plant juice Seawater, Fermented Seawater, Bio Mineral Water Vinegar OHN - Oriental Herbal Nutrient WCA - Water Soluble Calcium WCAP - Water Soluble Calcium Phosphate FFJ - Fermented Fruit Juice FAA - Fish Amino Acids S.E.S. - Seed and Seedling Treatment IMO to IMO2 IMO 3 IMO 4 & Liquid IMO IMO 5 Preserving bacterial based inputs Inputs - Section 5 - Water Soluble Calcium (WCA) Calcium is as important to plants as it is to humans. It is one of the most common substances in the world next to oxygen and silicon and the majority of calcium exists in the form of calcium carbonate (CaCO3). In Natural Farming, calcium carbonate is extracted from egg shells, shells from clams/oysters or from coral sand in which calcium carbonate is the main component by using a vinegar. Through this process, calcium carbonate is changed to water-soluble calcium, which can be quickly absorbed by the crop. It prevents overgrowth of crops, hardens the fruit, prolongs storage period, promotes absorption of phosphoric acid and helps crops to accumulate nutrients. Calcium carries and accumulates nutrients carbohydrate, which is temporarily stored in branches (pith) and in leaves till the final storage. Several soil characteristics affect the availability of calcium to plants: soils with higher pH have higher levels of available calcium than acidic (lower-pH) soils; soils with a higher capacity to absorb or hold calcium will have more available calcium; the presence of excessive amounts of sodium, potassium, or magnesium in the soil interferes with calcium availability. Calcium can also react with other soil nutrients, such as phosphorus, to form insoluble compounds that cannot be used by plants. Calcium is commonly applied as a soil amendment in the form of ground limestone (calcium carbonate) or gypsum (calcium sulfate). Water-soluble calcium (WCA) is an alternative to these commercial sources of calcium. Water-soluble calcium is a source of available calcium that can be made from commonly used household items, eggshells and from the shells of clams/oysters and vinegar. When applied as a foliar spray, WCA provides available calcium to plants for normal cell processes, root growth, and fruiting In Natural Farming, WCA is applied as a foliar spray during the reproductive stage of a plant’s growth cycle when setting fruit and vegetables are most vulnerable to blossom-end rot. Calcium in water soluble form is efficient and effective WCA is also effective when crops are overgrown, Plant leaves have bad color or no luster, Floral differentiation is weak, Flower blossoms just fall, Fruits do not ripen, Fruits are not sweet and crops are nitrogen-excessive. However, WS-Ca should not be given when vigorous vegetative growth is needed. Master Cho Recipe PDF - WCA WCA video by Onedrive WCA with eggshells by Chris Trump Chris Trump - WCA with eggshells - https://www.patreon.com/christrump Instructions for WCA Collect eggshells (oyster or clam shells may also be used); Remove the tough internal membrane from the inside of the shells. Break the shells into small pieces (1/4”). Lightly roast or grill the shells in a frying pan or foil container over low heat for approximately 45 minutes to remove any organic substances that will rot and contaminate the WCA. You can fan over top the eggshells while cooking to remove the unwanted egg lining. the wind from fanning will blow them away. Shells should be dry and lightly burnt to a light tan color but not charred. Slowly add roasted eggshells to a glass jar filled 2/3 full with brown rice vinegar, a store bought fermented vinegar will work just as well at a 1:10 ratio by weight. Vinegar should not be distilled. Add eggshells slowly or the solution can over foam and create a mess. The eggshell fragments will float up and down within the vinegar, emitting carbon dioxide bubbles, while the calcium is being dissolved into the solution. Cover the mouth of the jar with breathable cloth, such as muslin, or paper (not plastic) and secure with rubber bands or ties to keep out pests. Place the jar in a cool, dark location for 7 to 10 days. Letting it sit longer than needed will not hurt the WCA. After this time, check if bubbles are present in the solution. If bubbles are not present, the WCA is “saturated” – proceed to step 10. If bubbles are present, add more roasted eggshells and let stand for 1 to 2 more days. Repeat until the solution stops producing bubbles. Strain the vinegar-and-eggshell solution through a colander into a clean glass jar to remove eggshells. Label the WCA solution and store at room temperature out of direct sunlight. compost the remaining eggshells. Preparation of 1:1,000 WCA Solution Amount of wca _____________________________________________________________ Water Volume Kitchen utensil measurements Fluid ounces (fl oz) Milliliters (ml) ¼ gallon 1 /3 teaspoon (tsp) 0.06 2 1 gallon ¾ tsp 0.13 4 5 gallons 1¼ tablespoons (Tbsp) 0.64 19 10 gallons 2½ Tbsp 1.28 38 25 gallons little less than ½ cup 3.2 95 50 gallons little more than ¾ cup 6.4 189 WCA with Coral Sand Using coral sand is the easiest WCA method as their is no cooking off the shells needed. Chris Trump teaches WCA with coral sand. Chris Trump - How to WCA with Chris Trump - https://www.patreon.com/christrump WCA Coral Sand instructions (Oyster and clam shells can be used too) Add coral sand to jar. one part coral sand to 10 parts vinegar. Add vinegar slowly to the jar to prevent overflowing of bubbling. Use a fermented vinegar and not a distilled vinegar. Cover the mouth of the jar with breathable cloth, such as muslin, or paper (not plastic) and secure with rubber bands or ties to keep out pests. Do not have air tight or it will explode from pressure build up. Place the jar in a cool, dark location for 7 to 10 days. Letting it sit longer than needed will not hurt the WCA. After this time, check if bubbles are present in the solution. If bubbles are not present, the WCA is “saturated” – proceed to step 6. If bubbles are present, add more coral sand and let stand for 1 to 2 more days. Repeat until the solution stops producing bubbles. Strain the vinegar-and-coral sand solution through a colander into a clean glass jar to remove coral sand. Label the WCA solution and store at room temperature out of direct sunlight. compost the remaining coral sand. Use same as WCA made with eggshells. Reverend Peyton's big damn band sings us out! bigdamnbandofficial - This land is your land solo slide guitar. Credits TheGothardSisters http://www.cgnfindia.com/wsca.html College of Tropical Agriculture and Human Resources Onedrive Chris Trump bigdamnbandofficial For Just You! Natural Farming Inputs Introduction to Natural Farming LAB - Lactic Acid Bacteria FPJ - Fermented plant juice Seawater, Fermented Seawater, Bio Mineral Water Vinegar OHN - Oriental Herbal Nutrient WCA - Water Soluble Calcium WCAP - Water Soluble Calcium Phosphate FFJ - Fermented Fruit Juice FAA - Fish Amino Acids S.E.S. - Seed and Seedling Treatment IMO to IMO2 IMO 3 IMO 4 & Liquid IMO IMO 5 Preserving bacterial based inputs ~Cultural Healing and Life
-

From the album: Hempyfan
-
Natural Farming Inputs Introduction to Natural Farming LAB - Lactic Acid Bacteria FPJ - Fermented plant juice Seawater, Fermented Seawater, Bio Mineral Water Vinegar OHN - Oriental Herbal Nutrient WCA - Water Soluble Calcium WCAP - Water Soluble Calcium Phosphate FFJ - Fermented Fruit Juice FAA - Fish Amino Acids S.E.S. - Seed and Seedling Treatment IMO to IMO2 IMO 3 IMO 4 & Liquid IMO IMO 5 Preserving bacterial based inputs Inputs - Section 4 - (OHN) Oriental Herbal Nutrient OHN is a mixture of edible, aromatic herbs extracted with alcohol and fermented with brown sugar. It is used to discourage the growth of anaerobic, potentially pathogenic microbes and encourage beneficial aerobic microbes in the soil and on plants. The oriental Herbal Nutrient (OHN )is a very important input in Natural Farming. It is made from herbs which are full of energy and function to increase plant robustness, to sterilize and keep plants warm. OHN revitalizes crops and activates their growth. It is made from effective oriental herbs such as angelica, garlic, ginger, licorice and cinnamon that are fermented to maintain the vigorous growth during times of stress. OHN is one of the more multiple step inputs in natural farming but it is not truly complicated. With great instruction and explanation of the videos below they will walk you through this process with ease. OHN is truly a secret type of ingredient for maintaining plant health. It demonstrates its properties by promoting the microorganisms with micronutrients that are helpful and works to maintain health during stress. You can also additionally add to the ingredient list any anti-pathogenic plant such as turmeric. However, add it in addition too and not in place of the traditional ingredients found in the below recipe. Cho's Global Natural Farming PDF - University of Hawaii Chris Trump - How to OHN Chris Trump - Korean Natural Farming How to : OHN - To support Chris Trump direct: https://www.patreon.com/christrump OHN material list Recipe below is same as video above Containers: 6 containers for fermenting large mason jars 6 containers 2x the capacity of your fermenting containers 1 mixing container Ingredients: Dry angelica root Dry cinnamon bark Dry licorice root Fresh ginger Fresh garlic Beer (or other low alcohol liquid) Vodka (or other higher alcohol liquid) Brown sugar (6x the weight of the ginger you will use) Tools: A scale A funnel with a strainer A mesh bag to place over a funnel) keep each ingredient uncontaminated from the others. A wooden stick for stirring The Process Re-hydrate stage Ferment stage Stabilization Extraction stages Storage and use Stage 1 - Re-hydrate stage for dry ingredients. In this stage we simply want to ready the dry ingredients for the next fermenting stage. Dry angelica root (2 parts, so you make two containers) Dry licorice root Dry cinnamon bark Separately fill your jars with 1/10th with dry materials of the volume of your jars. (in mason jars is just below the first line, tip from Chris Trump) Angelica root, fill two jars to 1/10 of the jars volume of angelica root. Angelica is used at a higher dosage in the final mix so you will make two batches where with the others you make just one batch. Licorice root, fill one jar to 1/10 of the jars volume. Cinnamon bark, fill one jar to 1/10 of the jars volume. A total of 4 jars for the dry ingredients due to two jars of angelica root. Add beer to each of the jars so the total volume of each jar is half way full. Allow foam to settle and pouring to prevent foam will save you time. Label and cover with a breathable cover and let sit for 24 hours in a dark area. Stage 2 - Dry and Wet Ferment Stage Stage 2 - Dry In this stage we will start a ferment by adding brown sugar to the mix by weight and volume. However, total volume used in the jar is more important than precise weight. Fill to 2/3rd of the jar in total. Dry Ingredients, the jars from yesterday Weigh jars from yesterday. Add in equal amounts of brown sugar to each jar but pay attention to the volume of the jar not to exceed 2/3rd of the volume. Stir in a clockwise direction with a wooden stick (never metal) to ensure the sugar is dissolved and well mixed. Cover with breathable lid and set aside to prepare the wet ingredients. Store all jars in a dark area for 6 to 7 days, faster in warmer areas and slower in cooler areas as it is a fermentation process. Stage 2 - Wet In this stage we basically are making an FPJ with ginger and garlic. Traditionally garlic and ginger are used but if you have a plants in your area with similar or desired properties you can prepare similarly to ginger and garlic and add them in their own jar. You would later add them when you make a mix prior to using. Fresh ginger: Mash gently the ginger with the peels and place in a mixing container. Add equal amounts of brown sugar to each container. Example, 1 pound of ginger would need 1 pound of brown sugar. Ginger is wetter than the garlic, if need be you can add a little bit more sugar but not too much. Mix very well, similarly to making FPJ but with garlic. Add to jar and fill 2/3 of the jar full. Air gaps in jar will settle as it ferments. Cover with a breathable lid and store in a cool dark place. Label Jar Store all jars in a dark area for 6 to 7 days, faster in warmer areas and slower in cooler areas as it is a fermentation process. Fresh garlic: Mash gently the garlic with the peels and place in a mixing container. Add equal amounts of brown sugar to each container. Example, 1 pound of ginger would need 1 pound of brown sugar. Garlic is drier than the ginger, so no extra sugar is added to the garlic. Mix very well, similarly to making FPJ but with garlic. Add to jar and fill 2/3 of the jar full. The garlic is fluffy when filling the fermenting jars. Add in the same amount as ginger. Push down in jar to fit. The garlic will settle as it ferments. Cover with a breathable lid and set in cool dark place. Label Jar. Store all jars in a dark area for 7 days. Union Break! DopeLemonVEVO - Uptown Folks Stage 3 - Stabilization 7 days later. In this stage we want to stop the fermentation process and stabilize. If any mold should form on some of them, in OHN making it is ok as the alcohol will stabilize everything. In this instance it is ok. Use vodka or similar. You want a higher alcohol than wine and of the hard liquor category. Pour some vodka but not full yet Stir the jars clockwise with wooden stick and ensure everything mixes Be sure to get any sugar on the bottom of the jars are mixed. Pour more vodka to the brim. Cover with a lid or plastic to make air tight. Do this for all jars and store in dark area. Stir clockwise once daily for the next 14 days, you will open and stir the containers. Use a clean untreated piece of wood stick to use. Stage 4 - Extraction Process. Extraction stages Extraction Jars, anything but metal but if you use plastic use HDPE plastic as this will not leach into your material. Extraction Jars needs to be big enough for hold the whole volume, you will get about twice as much as you put in for OHN ingredient jar. Strainer Wooden stick The extraction process is done in 5 separate stages over time for a total of 5 extraction sessions. 1st extraction, 14 days stirring every day until next extraction, 2nd extraction, 14 days stirring every day 3rd extraction, 14 days stirring every day 4th extraction, 14 days stirring every day 5th extraction, 14 days stirring every day Extraction Start with angelica as its extraction amount is used for overall ratio alterations for garlic and ginger jars. Pour in all liquid from each jar into the extraction jar. Label (not on lid, great tip by Chris Trump) Ensure all solids are back in the fermenting jar. Fill back 2/3 full of the fermenting jar with the liquid you just extracted. Fill the remaining 1/3 of the fermenting jar with more vodka, Stir with wooden stick. Leave enough room to be able to stir everyday. We need to determine extraction amounts for the rest specifically the garlic and ginger levels. Using the angelica extracted volume as your guide. Repeat this extraction again in 14 days or a total of 5 extraction sessions. Ensure all extractions are same level adjusting as necessary. Final extract, strain all fermenting jars and pour all liquid into extraction jar. After final extraction you can compost the remaining ingredients from the jars. Seal jars airtight and store out of direct sunshine or bright light. Adjusting fermenting amounts The extraction amount at the very end of this process should be the same for all extraction jars but we may need to adjust along the way the extraction amount. The extracted amount is less than the angelica extracted. Originally you would fill back 2/3 full of the fermenting jar with the liquid you just extracted. Fix Pour back less of the extracted amount and pour in more vodka to match the volume difference. This can be adjusted during each extraction session so that the final amounts are at same level. Stir with wooden stick. Leave enough room to be able to stir everyday. The extracted amount of garlic or ginger is more than the angelica amount. Originally you would fill back 2/3 full of the fermenting jar with the liquid you just extracted. Fix Remove some garlic, ginger or whatever the ingredient is. Pour back 2/3 of the extracted liquid top off with vodka as normal leaving room to stir. Stage 5 - Storage and mixing for use Store in separate containers only mixing when you are going to use. Store out of direct sunlight and bright lights. OHN improves over time in strength. Mixing for use: 1 part of each extraction jar. (Angelica is given twice and is reason we made two jars for angelica.) Fresh batch and under 6 months mix at 1:1000 dilution rate. Make the solution weaker (1:1,500) if it is to be applied to stressed plants or during drought conditions, or if the OHN has been concentrated by storage for more than 6 months. How to use OHN OHN is used for making IMO - 3, IMO - 4, the soil treatment solution, and the seed treatment solution. OHN is also good for all of the growth periods of crops, nutritional growth period, change-over period and reproductive growth period. OHN can be used throughout the early, vegetative, changeover/transition and fruiting or reproductive stages at the basic dilution ratio of 1: 500 to 1000 times in water. Apply as a foliar spray on plants to repel insects. Apply during late afternoon or early morning hours. OHN can be mixed in a cocktail with Fermented Plant Juice (FPJ) and Brown Rice Vinegar (BRV) and applied as a foliar spray every 10–12 days to make plants less susceptible to powdery mildew and downy mildew. Apply diluted OHN as a soil drench prior to planting to activate dormant soil microorganisms. Part of a seed-soak solution 2 tsp if you feel a cold coming might help. When crops are weakened To reinvigorate weakened crops, a mixture of OHN (1:1000) with FPJ (1:500) and BRV (1:500) can be applied. For plants with soft rot or anthracnose, WCA (1:1000) is added to the mixture Animals and Livestock As a pre-biotic in poultry and livestock production OHN can be mixed with animals’ drinking water (1:1,000 dilution) and offered ad libitum 3 times a week. Preparation of 1:1,000 OHN Solution Water Volume Amount of OHN Kitchen utensil measurements Fluid ounces (fl oz) Milliliters (ml) ¼ gallon 1 /3 teaspoon (tsp) 0.06 2 1 gallon ¾ tsp 0.13 4 5 gallons 1¼ tablespoons (Tbsp) 0.64 19 10 gallons 2½ Tbsp 1.28 38 25 gallons little less than ½ cup 3.2 95 50 gallons little more than ¾ cup 6.4 189 Union Break CatClydeVEVO - Mama Said Example of a documented first run, excellent video with practical advice and illustration from a new OHN maker. George T - OHN - Oriental Herbal Nutrients Credits https://cms.ctahr.hawaii.edu/home.aspx http://www.cgnfindia.com/ohn.html Chris Trump DopeLemonVEVO George T CatClydeVEVO The School of Life Natural Farming Inputs Introduction to Natural Farming LAB - Lactic Acid Bacteria FPJ - Fermented plant juice Seawater, Fermented Seawater, Bio Mineral Water Vinegar OHN - Oriental Herbal Nutrient WCA - Water Soluble Calcium WCAP - Water Soluble Calcium Phosphate FFJ - Fermented Fruit Juice FAA - Fish Amino Acids S.E.S. - Seed and Seedling Treatment IMO to IMO2 IMO 3 IMO 4 & Liquid IMO IMO 5 Preserving bacterial based inputs Congratulations for learning about OHN. Israel "IZ" Kamakawiwoʻole. Thank you! RIP. ~Cultural Healing and Life
-
the added sugar stops the process and stabilizes it. That is a great question and I cannot find a definitive answer and I have no experience with that as I kept in refrigerator. I suggest using the same dilution rates. I will try to find a more experienced answer. I believe it will be the same as in nothing can I find mention other than to stabilize it but nothing if a change in dilution rates. Use on something stinky and if not effective make more concentrated until effective and then use those dilution rates.
- 13 replies
-
- 1
-

-
- lab
- lactic acid bacteria
- (and 12 more)
-
The ratio is the same for use regardless if adding sugar or not. It does not affect volume but by adding in the brown sugar you stabilize it. Refrigerating does the same but you dont need to put in more sugar if kept in fridge. I always kept mine in the fridge but I do not believe the extra sugar is an issue as it is a balance but I am not speaking on experience with that one. Keep it coming, your questions are spot on!
- 13 replies
-
- 1
-
-
- lab
- lactic acid bacteria
- (and 12 more)
-
no on freezing but if you keep in refrigerator it will last about 6 months to a year. You can add sugar and keep it stable at room temperature. Add equal amounts of brown sugar and mix. (remember no metal stir or containers as it reacts badly.)
- 13 replies
-
- 1
-
-
- lab
- lactic acid bacteria
- (and 12 more)
-
This made my day! I will soon be making some lab myself. Just got done working out which biochar design I will use and a few other odds and ends and i will start making inputs. Thank you for documenting your lab journey! I am sure it will lead to other great things. Now go out and see what all lab can do. After diluting for use, spray any where stinky. I love it for about anywhere and on anything and in growing when mixed with other inputs it becomes part of something greater! Any plans for the curds? A bit of a smile. The Muppets - The Ballad of Beaker Congratulations and we appreciate the sharing!
- 13 replies
-
- 1
-

-
- lab
- lactic acid bacteria
- (and 12 more)
-
I very much appreciate that. It was an honor I consider it done now. I am sure I have a ton of edits grammatically and such but substance I think I got it all down. We were great together and will still be so spirit, energy and all that she melded into me.
-
Love it and I look forward to your findings on the smell. thanks for sharing
-
Updated with a soundtrack. Please let me know what you think. I write in different perspective as it is easier for me as this is personal.
-
Natural Farming Inputs Introduction to Natural Farming LAB - Lactic Acid Bacteria FPJ - Fermented plant juice Seawater, Fermented Seawater, Bio Mineral Water Vinegar OHN - Oriental Herbal Nutrient WCA - Water Soluble Calcium WCAP - Water Soluble Calcium Phosphate FFJ - Fermented Fruit Juice FAA - Fish Amino Acids S.E.S. - Seed and Seedling Treatment IMO to IMO2 IMO 3 IMO 4 & Liquid IMO IMO 5 Preserving bacterial based inputs Inputs - Section 4 Vinegar Vinegar is an important element in natural farming as it disinfects and melds well with other inputs and various natural farming materials. It is part of a natural circle of making inputs as often is made from the left overs from a herb or fruit based fpj (fermented plant juice) input. Vinegar can be made from many of materials such as apples (cider vinegar), grapes (wine vinegar), grains, herbs, berries, other fruits, or even from a 10 percent sugar solution and thus is sort of difficult in determining where to start in this vinegar compilation. I believe when confronted with a complexity it is best to simplify the issue a bit and then work up to the complexities. So I will follow my own advice and start with the very basics of vinegar. All these vinegar's and processes will similarly work in the end in natural farming. Remember, quality in gives quality out when selecting materials to use. Natural Farming Uses Vinegar is used for making "Seed and Seedling" Treatment, treatment of Nutritional Growth Period, Changeover Period and Reproductive Growth Period. It helps the beneficial soil life in the soil flourish. For the purpose of sterilizing, use vinegar with a dilution ratio of 1:500 at the juvenile leaf stage and a ratio of 1:200-1:300 at the adult leaf stage. Vinegar in low concentrations facilitates vegetative growth and affects the initial growth of leaves. If vinegar is applied on the leaves, it helps them form the wax layer, which creates thicker leaves, fastens foliation and increases resistance to diseases and insects. Vinegar improves the flexibility of trees and increases absorption ability when Natural Farming materials are sprayed. When vinegar is used with water-soluble calcium, BRV maximizes the effect of calcium. Eggshells in BRV will make water-soluble calcium. When vinegar is used to dissolve animal bones (cow / pig / chicken / fish ) makes water-soluble calcium phosphate. Vinegar is used for making IMO-3, IMO-4 and enriching compost. What is vinegar The dictionary defines vinegar as “sour wine” or “a sour liquid obtained by acetic fermentation of dilute alcoholic liquids and used as a condiment or preservative.” Vinegar is made by two distinct biological processes, both the result of the action of harmless microorganisms (yeast and “Acetobacter”) that turn sugars (carbohydrates) into acetic acid. The first process is called alcoholic fermentation and occurs when yeasts change natural sugars to alcohol under controlled conditions. In the second process, a group of bacteria (called “Acetobacter”) which converts the alcohol portion to acid. This is the acetic, or acid fermentation, that forms vinegar. Proper bacteria cultures are important; timing is important; and fermentation should be correctly controlled. Although acetic acid is the primary constituent of vinegar aside from water, acetic acid is not vinegar. Vinegar contains many vitamins and other compounds not found in acetic acid such as: Riboflavin, Vitamin B-1, Mineral salts from the starting material that impart vinegar with its distinct flavor. If it can ferment, you can make vinegar out of it and thus their are almost countless varieties of vinegar you can make. From culinary specialty vinegar to general use vinegar the options are almost endless. Vinegar is to some a sacred ingredient I hope you soon appreciate on a rich level. When vinegar is made by oneself and its benefit is experienced it can give you a level of satisfaction as it is in part, living in harmony with nature. From a natural farming perspective this is in part, part of its charm. About Wood Vinegar This is not wood vinegar. Wood vinegar is a different thing which is basically smoke condensed in water and diluted and sprayed on the soils and compost. I will separately write on wood vinegar as it is not this type of vinegar. Wood vinegar is more available and wider known in Asia and the South Pacific areas than in the Western markets. Making Vinegar - Starting from Scratch Apple cider vinegar examples but almost anything can be made into a vinegar. Starting a from scratch vinegar without adding a mother or boosting bacterial input. Clean working area and container. Sterilize container a 1 to 4 ratio of apples to water. Chop the apples into chunks, about an inch or two. (Do not mash as it will float and you will have a high possibility of mold.) Add 2 tsp to a cup of brown sugar (to help jump start microbes) (optional) Fill with slightly warm water Since it is new, we want to push down anything floating on the top to prevent mold. Weight down to keep submerged or stir at least once a day. This helps prevent mold which cant form easily when wet. The time is longer when starting from scratch. By using a mother you can decrease this time to about a month. Finishing time varies due to environment so I give general time frames. Determine done by smell and taste and should be vinegar like. When the first ferment is finished; Strain and bottle and cover with breathable covering. Cover with breathable cover and give it about a month or longer. The longer you ferment the second time the stronger the vinegar concentration. The left over material can be used as animal feed or compost or worm food. In the video he adds some oatmeal for his chickens. To make mother, After straining, recover with a breathable cover let sit, stage 10 above. In one to two months a nice mother should form Another method to make a mother is expose a mixture of one-half vinegar and one-half cider to a temperature of 80 degrees for a few days. The thin scum that forms on the surface is mother of vinegar. Cover with breathable cover and let sit and the mother will grow. When totally finished you can strain and bottle. Leave mother in some vinegar for next round. The following is rich in instruction and information full of great tips and advice. Melissa K. Norris - How to Make Homemade Raw Apple Cider Vinegar With Mother Starting a vinegar with a mother and boosting vinegar. Clean working area and container. Sterilize container a 1 to 4 ratio of apples to water. Chop the apples into chunks, about an inch or two. (Do not mash as it will float and you will have a high possibility of mold.) Add 2 tsp to a cup of brown sugar (to help jump start microbes) (optional) Fill with slightly warm water Cover with breathable cover. Since it is new, we want to push down anything floating on the top Weight down to keep submerged or stir at least once a day. This helps prevent mold which cant form easily when wet. Do this until everything stays submerged and then forget for about 3 months. The time is long as you are starting from scratch. By using a mother you can decrease this time to about a month. Finishing time varies due to environment so I give general time frames. Determine done by smell and taste, if it smells like vinegar and taste like vinegar, its vinegar! When the first ferment is finished; Strain and bottle and cover with breathable covering. Add the mother and some of aged finished vinegar. The longer you ferment the second time the stronger the vinegar. The left over material can be used as animal feed or compost or worm food. In the video he adds some oatmeal for his chickens. To make mother, After straining, recover with a breathable cover let sit, stage 10 above. In two to three weeks the vinegar with mother should be ready. Another method to make a mother is expose a mixture of one-half vinegar and one-half cider to a temperature of 80 degrees for a few days. The thin scum that forms on the surface is mother of vinegar. Cover with breathable cover and let sit and the mother will grow. Any fruit or even herbs can be used. In the following video series shows cutting versus blending the apples along with an immense amount of information throughout the whole process. Much of these videos will overlap but they all offer great tips and advice that I recommend watching all of them regardless of your selected process as it will help in gaining a richer understanding of the subject. The following video series is made by Colorful Canary She demonstrates preparing the jars very well so they will be clean and sanitized. The video above illustrates issues with blending the apples compared to chunky apples. She demonstrates how to keep the apples down while starting the early fermentation process. Excellent illustration of finished first ferment and when to strain and prepare second stage. Adding mother and about mother. Beginning of second ferment and start to make vinegar and mother. Bottling stage of vinegar. Discusses failure of using blended apples. Example of mother made Gone bad, apple cider vinegar example. Heavenly Soaps & Such - Homemade Apple Cider Vinegar with the Mother - Bragg Style - Gone Bad Vinegar from FPJ (Fermented Plant Juice) Making vinegar out of FPJ is very similar as the above recipes except you use the left overs of the fpj process. Clean working area and container. Sterilize container Fill with slightly warm water to two parts water to one part FPJ leftovers. Video mark: 3:04 for illustration. Cover with breathable cover. Weight down to keep submerged or stir at least once a day. This helps prevent mold which cant form easily when wet. Finishing time varies due to environment so I give general time frames. Determine done by smell and taste, if it smells like vinegar and taste like vinegar, its vinegar! When the first ferment is finished; Strain and bottle and cover with breathable covering. Add the mother and some of aged finished vinegar. The longer you ferment the second time the stronger the vinegar. The left over material can be used as animal feed or compost or worm food. In the video he adds some oatmeal for his chickens. To make mother, After straining, recover with a breathable cover let sit, stage 10 above. In two to three weeks the vinegar with mother should be ready. Another method to make a mother is expose a mixture of one-half vinegar and one-half cider to a temperature of 80 degrees for a few days. The thin scum that forms on the surface is mother of vinegar. Cover with breathable cover and let sit and the mother will grow. Excellent tutorial and instruction. Chris Trump - How to Vinegar. https://www.patreon.com/christrump Brown Rice Vinegar Traditional methods The traditional recipe is from Kim CS/Chang and is a natural farmer. http://kimcschang.blogspot.com/2011/10/making-brown-rice-vinegar.html Making Brown Rice Vinegar Rinse twice and soak approx. 500g of grain and soak for 12-24 hours. Cook in rice cooker. Place in wide bowl and Mash; Pour onto rice mash 250g of rice malt and mix well. Make into porridge consistency with 2 liters of natural water, Then apply 2g of dry yeast and mix well. Fill in the container( If you have Korean clay container that is the best) to 2/3 of volume, Then cover with 2 layer of gauze or breathable lid. Put a coin (copper penny) on top to weigh down the gauze. Keep in an environment outside of the sunlight,external temperature should be 75-85F. It is best not to move the container around. After 6 month, the coin (copper penny) will turn bluish green. Continue to ferment for 4-6 month to completion. Filter and collect clear solution in a new container. Approx. 1.6 liters of vinegar is produced. Seal and store in cool area. Rice vinegar made from makgeolli Makkoli is a rice wine that if left to ferment longer for 15 days will turn to rice wine vinegar. The following 3 videos illustrate 3 slightly different methods and explain the process very well. White or brown rice can be used but brown rice is more desirable I believe due to it being less processed in making brown rice vinegar. Makgeolli Max Lee - How to Make Korean Rice Wine Makkoli at Home! [막걸리] Makgeolli Lab - How to Make Makgeolli Maangchi - Makgeolli (Korean rice liquor: 막걸리) Maintaining Mother of Vinegar We need our mothers happy in vinegar just as we do in life. This will illustrate how to maintain a vinegar mother if you need to store and maintain it. The mother will feed off of alcohol and this can be any alcohol but generally you would use an alcohol type that your vinegar is from. Such as hard cider for apple cider vinegar, rice wine or rice beer for brown rice vinegar and red wine for red wine vinegar for best practice. When the process stops and needs more alcohol the mother will sink to the bottom. Simply add some more alcohol and the process will continue and your mother will increase in size as time goes on. You can use this as mother seeding material when making vinegar in the second stage after straining. Ted Keller - Feeding My Vinegar Mother Vinegar Tips and Uses Wash hands before touching any mothers. Use only fresh uncooked cider or grape juice without any preservatives. Preservatives will prevent it from turning to vinegar. The first fermentation, which occurs throughout the liquid, the second process takes place only on the surface of the vinegar. The larger the surface area in relation to the volume, the faster the vinegar will be produced. Mother of vinegar can be found at the following locations if you cannot find: USA - http://www.beer-winemaking.com/vinegar-starter-kit/mother of vinegar https://www.amazon.com/ - Search "mother of vinegar" select a vinegar with mother UK - http://www.edennuganics.co.uk/apple-cider-vinegar-main-cx-acv/applecidervinegar.html https://www.amazon.co.uk/ - Search "mother of vinegar" select a vinegar with mother PH of finished vinegar should be around 2.4ph. Vinegar as a weed killer - I have seen studies for and cautionary on this. In my view it is fine to use but results may vary. The concentration is the key part but for my view this might take some concentration adjustments to find the effective concentration of the acetic acid percentage for your crop area. I have seen more writings that indicate it might kill the shoots but not the roots and if so this is not good an effective weed solution on its own. Below is a portion of some of those writings. Oregon State PDF on vinegar - https://oregonstate.edu/dept/nursery-weeds/weedspeciespage/acetic_acid_factsheet.pdf ARS is the U.S. Department of Agriculture’s chief scientific research agency. - https://www.ars.usda.gov/news-events/news/research-news/2002/spray-weeds-with-vinegar/ As a weed killer, in natural farming we often view weeds as a positive part of the ecosystem but this is generic view and I view each situation uniquely as one location factors can be different than another locations. Home made vinegar can be stronger than store bought vinegar. Dilute to taste and preference. If this was new to you or this has helped you it has been an honor but remember the real praise is to those who made the videos and information available and we ask that you support them direct. Congratulations for learning about Vinegar Credits: Melissa K. Norris Colorful Canary Heavenly Soaps & Such Chris Trump http://www.cgnfindia.com/index.html http://kimcschang.blogspot.com/ Max Lee Makgeolli Lab Maangchi Ted Keller The Reverend Peyton's Big Damn Band alyankovicVEVO The School of Life Natural Farming Inputs Introduction to Natural Farming LAB - Lactic Acid Bacteria FPJ - Fermented plant juice Seawater, Fermented Seawater, Bio Mineral Water Vinegar OHN - Oriental Herbal Nutrient WCA - Water Soluble Calcium WCAP - Water Soluble Calcium Phosphate FFJ - Fermented Fruit Juice FAA - Fish Amino Acids S.E.S. - Seed and Seedling Treatment IMO to IMO2 IMO 3 IMO 4 & Liquid IMO IMO 5 Preserving bacterial based inputs ~JJ the Gardener
-
Soil Recipe
JJ the Gardener replied to JJ the Gardener's topic in Soil, Compost, Vermicompost & Biochar
After I am done with the natural farming input section I will talk about integrating natural farming into the indoor garden. Using IM04 and some other inputs makes virtually magic earth! I did similar to you I think. I started with soil and then moved to passive hydro then to hydro in many forms settling in with ebb and flow and learning the plants and environment very well for these methods, by this time I had a very good understanding of plant physiology and what I thought I knew about plant nutrition and environment and I worked out much of what I talk on. I then made up my soils and ran the same plants side by side in hydro and soil and this is how I dialed in for my soil for the same type of plants. This helped much in advancing my appreciation of environment, nutrients and plant development in regards to how to better input for soil and hydro. I like best for hydro: Blocks with drainage for your plant type are best practice but I never worked with. Mapito. Coco/Soiless Mix/Perlite. -
Natural Farming Inputs Introduction to Natural Farming LAB - Lactic Acid Bacteria FPJ - Fermented plant juice Seawater, Fermented Seawater, Bio Mineral Water Vinegar OHN - Oriental Herbal Nutrient WCA - Water Soluble Calcium WCAP - Water Soluble Calcium Phosphate FFJ - Fermented Fruit Juice FAA - Fish Amino Acids S.E.S. - Seed and Seedling Treatment IMO to IMO2 IMO 3 IMO 4 & Liquid IMO IMO 5 Preserving bacterial based inputs Inputs - Section 3 Fermented Seawater and Bio Mineral Water This section is not an argument against using regular water but is about creating a water solution utilizing trace mineral rich waters that will integrate and blend together to enhance with other natural farming input ingredients and together this harmony will do much to help maintain the health of your plants and play a role in obtaining desired brix levels. Generally, it assist the plant and the soils bio-life by proactively maintaining a usable and stable mineral and trace mineral media condition that can be utilized right away by the plant and by microbiological life. This takes water to the next level when used in this way and perhaps this compilation might change what you think you know about water and gardening/farming! University of Hawaii PDF on Natural Farming: Diluted Seawater - https://www.ctahr.hawaii.edu/oc/freepubs/pdf/sa-9.pdf A video about Seawater and gardening Smiling Gardener Sea Fertilizer - Ocean water quickie - This is not ad for Ocean sea minerals but is good at describing ocean water. Smiling Gardener Sea Fertilizer - An Amazing Organic Fertilizer From The Ocean How to Collect Seawater and Sun Dried Salts Collect seawater at a depth of no more than 1 to 2 inches below the surface near sea shorelines. Deeper seawater contains more salt is thus is more concentrated. Brackish water may also be collected where fresh water mixes with seawater. The organic matter in sea water produces an excellent effect when the microbes of land and the minerals and microbes of seawater meet. This water will have more microbial life in it. Sun dried salts can be used if unable to get seawater. Large acre application is applied to soil at 5 kg for every 10 acres. Dilute sun dried salts at 2ml for 1000 ml of water for smaller scale. Seawater and sun-dried salt are two sources of nutrients and minerals regarded by Natural Farming as also essential together with NPK. Bio Mineral Water alternative and is used same as seawater and should be diluted similarly as a compost or garden tea. Using an air pump and riser you run water over rocks, imo4, compost or what have you over time and this breaks up bits of rocks and makes a good mineral water over time and when combined with Imo4 and garden tea of choice is similar as seawater and is good alternative for those who are landlocked or without a good sea water or quality sun dried salt. If you watch the following video on youtube and click on transcript it will be easier to follow along. Natural Farming BMW Drake - Natural Farming BMW Drake - Natural Farming BMW How To Prepare Pour the collected water into a large bowl and allow it to sit, uncovered, for 24 hours. This allows evaporation, aeration, concentration of solids, and the inoculation of airborne microorganisms to occur. (Diluted Salt Water) DSW is prepared by mixing the seawater with fresh water at a 1:30 dilution. Preparation of 1:30 DSW Dilutions Volume Needed Seawater Fresh Water 24-oz trigger bottle ¾ fl oz 24 fl oz 1 qt 1 fl oz 32 fl oz 1 gal 4 fl oz 4 qt or 128 fl oz 5 gal 20 fl oz 20 qt or 640 fl oz Keep seawater in a clean glass jar with a lid out of direct sunlight. DSW does not have a long shelf life and should be used soon after preparation. If DSW takes on a foul odor or if a white haze or white mold resembling cotton balls forms in the jar, discard it and make a new batch. Uses Seawater and sun dried salts are often used as a component in a “cocktail” with other Natural Farming inputs. Adding rice-washed water (5ml) brings out its best properties. Rice washed water has an effect like that of yeast. Rice-washed water and fermented plant juice (5ml) to sea water (diluted 30 ml to one lit water) brings out its best properties for growing direction based on the type of FPJ. Adding FPJ for me is like giving the direction of the type of growth to match the type of fpj. It is more effective when oriental herbal nutrient is mixed in with rice washed water, prepared seawater and FPJ. Seawater combined with other inputs stimulates the growth of beneficial microorganisms that can help to suppress disease. DSW is used along with IMO4 (Park and DuPonte 2008) and BRV, FPJ, LAB, FAA, OHN, WCP and MA as a soil treatment drench prior to planting the field. It is also used in Natural Farming’s type III foliar spray during the reproductive stages or fruiting period of a plant’s life cycle (Cho 2010), applied on a set schedule once every three weeks. On fruiting trees DSW is used as a light spray two weeks prior to ripening to increase sweetness or brix within fruit. To sweeten fruits. WS-Ca is added to diluted seawater and then the solution is sprayed twice in one month and then 20 days before harvest. Prevent feather loss in chickens. To avoid feather loss of chickens in summer, Brown rice vinegar BRV (200) and water soluble calcium WS-Ca (500) is mixed with diluted seawater and fed to chickens once in two days. How to apply to garden Always make sure that the dilution (1:30) of DSW is made properly. Apply DSW onto plants with a watering can, sprayer, or irrigation system to encourage ripening, ideally early in the morning. For soil treatments, Moisten the soil prior to applying DSW, then lightly water again after DSW application. DSW can be applied monthly or as little as once a year, depending on weather conditions. If plants start to show signs of yellowing a few days after spraying with DSW, lightly water plants and dilute further for next applications. If problem persists, DSW should be tested for cation-exchange capacity and salt content at a water quality laboratory with your county extension agent. Additional Information Some essential plant nutrients found in seawater and their functions in plants Name Chemical symbol Relative % in plant Function in plant Nutrient category Nitrogen N 100 Proteins, amino acids Primary macronutrients Phosphorus P 6 Nucleic acids, ATP Primary macronutrients Potassium K 25 Catalyst, ion transport Primary macronutrients Calcium Ca 12.5 Cell wall component Secondary macronutrients Magnesium Mg 8 Part of chlorophyll Secondary macronutrients Sulfur S 3 Amino acids Secondary macronutrients Iron Fe 0.2 Chlorophyll synthesis Micronutrients Copper Cu 0.01 Component of enzymes Micronutrients Manganese Mn 0.1 Activates enzymes Micronutrients Zinc Zn 0.03 Activates enzymes Micronutrients Boron B 0.2 Cell wall component Micronutrients Molybdenum Mo 0.0001 Involved in N fixation Micronutrients Chlorine Cl 0.3 Photosynthesis reactions Micronutrients Source: Motavalli and T. Marler 1998. Salinity of seawater in various seas* Sea % Salinity Baltic Sea (least saline) 0.5% Caspian Sea 1.2% Caribbean Sea 3.6% Mediterranean Sea 3.8% Red Sea 4% Dead Sea 24–33% *The ocean’s salinity varies slightly, from about 3.2% to 4%, with an average of 3.5%. However, salinity in isolated bodies of seawater is higher than in the open sea (Turekian 1968). The late Ronnie Davis sings us out! Reggaeville Ronnie Davis - My World (Acoustic) [Official Video 2017] Ronnie, you are missed and respected! Credits: http://www.cgnfindia.com/sw.html Master Cho University of Hawaii Smiling Gardener Drake The School of Life XL Recordings The Avalanches Reggaeville Ronnie Davis Natural Farming Inputs Introduction to Natural Farming LAB - Lactic Acid Bacteria FPJ - Fermented plant juice Seawater, Fermented Seawater, Bio Mineral Water Vinegar OHN - Oriental Herbal Nutrient WCA - Water Soluble Calcium WCAP - Water Soluble Calcium Phosphate FFJ - Fermented Fruit Juice FAA - Fish Amino Acids S.E.S. - Seed and Seedling Treatment IMO to IMO2 IMO 3 IMO 4 & Liquid IMO IMO 5 ~Cultural Healing and Life
-
Natural Farming Inputs Introduction to Natural Farming LAB - Lactic Acid Bacteria FPJ - Fermented plant juice Seawater, Fermented Seawater, Bio Mineral Water Vinegar OHN - Oriental Herbal Nutrient WCA - Water Soluble Calcium WCAP - Water Soluble Calcium Phosphate FFJ - Fermented Fruit Juice FAA - Fish Amino Acids S.E.S. - Seed and Seedling Treatment IMO to IMO2 IMO 3 IMO 4 & Liquid IMO IMO 5 Preserving bacterial based inputs Inputs - Section 2 - FPJ - Fermented Plant Juice FPJ is a fermented extract of a plant’s sap and chlorophyll's. It is a rich enzyme solution full of microorganisms such as lactic acid bacteria and yeast that invigorates plants and animals. FPJ is used for crop treatments and can be added an input for making other natural farming inputs. FPJ captures the essence of the fermented plant and in this way FPJ becomes like a super gardener power that for some is one of their secret ingredients! This means you can create your own specific boosters for the developmental stage of your plants. You simply utilize the matching plant with the properties to fit the period of development for your growing plants. Additionally, if mixed with a rice bran and sprinkled around the base of a tree or a plant will attract bugs to that area and away from the fruits. FPJ - PDF from The University of Hawaii, click emoticon Video Section The following 3 videos are worth watching them all as they compliment one another in information and wisdom. It is with pleasure that I introduce Chris Trump talk on FPJ, fermented plant juice who explains it effectively well. Chris Trump - How to : FPJ - To support Chris Trump direct: https://www.patreon.com/christrump Large Scale FPJ Chris Trump - How to : FPJ - To support Chris Trump direct: https://www.patreon.com/christrump It is with pleasure that I introduce Alika Atay FPJ teaching James Yunker Alika Atay Teaches How to Make Fermented Plant Juice - http://mauiindependent.org/native-wisdom-water-protector-alika-atay-on-the-power-of-we-the-people/ An excellent FPJ video with useful tips and information regarding collection and is a must watch. Video is not embedded by request at youtube, click the emoticon to watch the video at youtube. Instructional Section This FPJ recipe is from Master Cho, click to visit. FPJ is a fermented extract of a plant’s sap and chlorophyll's. It is a rich enzyme solution full of microorganisms such as lactic acid bacteria and yeast that invigorates plants and animals. FPJ is used for crop treatments. Materials/ ingredients needed: Non poisonous vibrant plants that fit the growth properties you are wanting such as: Mugwart / Water amaranth / Bamboo shoot etc. Jaggery / Brown sugar Glass / Ceramic / Clay jar with a wide mouth. (No metal) Porous paper (paper towel) Rubber band / thread Sharp Knife or Scissors Large mixing container with wide mouth Storage container of ceramic / glass /HDPE plastic (no metal) Scale WHAT TYPE OF PLANTS TO COLLECT Use only the same type of plants when collecting per FPJ batch. Plants that are strong against cold and can grow well in spring. This is in order to pass down the characteristic of plants that can endure extreme climatic changes. Plants that grow fast and are vigorous. Fast developing plants have growth hormones at are very active. This characteristic can improve any plant weaknesses and the recovery of certain health problems of the plants. Thinned-out fruits have a lot of gibberellins which makes plants healthy with thicker foliage and enhances the thickness of fruit. Never poisonous plants. WHEN TO COLLECT Avoid days when there is excessive sunshine or rainfall. Excessive sunshine may evaporate nutrients. Too much rainfall may wash away important nutrients and microorganisms. When there is rain, collect only after two days. Do not rinse with water. Collect the ingredients just before sunrise. Plants have perfect moisture level during this time. Take tips 2 to 3 inches long. HOW TO MAKE FPJ Shake off dirt from the Plants but do not wash in water. Washing will remove useful microorganisms. If the ingredients are too big, cut them to adequate sizes, about 3 to 5 cm. This increases contact surface area and promotes osmotic pressure. (Do not mix different kinds of ingredients in one container. Use separate container for each ingredient.) Measure the weight of the ingredient and the weight of brown sugar. Brown sugar should equal the weight of the ingredient. You should add or subtract sugar according to plant’s moisture level. Put the ingredients and brown sugar in a large wide container and mix them with your hands. Everything is to be covered with brown sugar as to ensure osmotic pressure. Cover with porous paper and leave for 1 to 2 hours. Put the mixture into a glass or clay pot. It should fill up ¾ of the jar. It is important that the jar is not too full or under full. The empty space is optimum for fermentation to occur. Put weight (Stone) on the mixture to control the amount of air in the mixture. Put on the breathable cover and tie the jar. A cover is needed to prevent insects from getting into the mixture. Paper is ideal because it lets the air in and out. 24 hours later check volume of material in jar. This is important to insure proper fermentation. If it has settled under 2/3 jar, add more mixture until 2/3 full. If it is too full remove some material until the jar is 2/3 full. 1 or 2 days remove the weight. After the air has escaped, put breathable cover back on. Place the jar in a cool and shaded place. Do disturb the ingredients during the process of fermentation. You will know that fermentation is occurring when bubbles start to form, which normally occurs on the second day. Ideally, fermentation should take no longer than 7 days, as the quality of FPJ appears to diminish thereafter. Fermentation is complete when: The plant material floats and the liquid settles at the bottom If too much brown sugar was used, this separation is not distinct. There is a light alcohol smell due to breakdown of chlorophyll The liquid tastes sweet, not bitter. After fermentation is complete (3 to 7 days), separate the plant material from the liquid using a colander or strainer. The spent plant material can be used as animal feed, or added to mixed compost (another input known as IMO#5). The liquid is Fermented Plant Juice (FPJ), which can be used immediately or stored in a loosely covered container. Transfer the FPJ into a glass or food-grade polyethylene (PE) plastic container. The microorganisms in the solution are alive and continue to produce gases. The lid must be kept loose or the container can explode. As with all Natural Farming inputs, each batch should be stored separately. They should be combined only when a solution is being mixed for immediate use. Refrigerate for short term use. For long-term storage and can be stored at room temperature, add an equal amount of brown sugar by weight to FPJ to prevent it from souring Preparing and Applying FPJ Dilute FPJ with water It is best to use a mixture of old and newly made FPJ in your solutions. FPJ is generally used at a concentration of 1 part per 500 parts water (1:500) If a more dilute solution is necessary (1:800 to 1:1,000) To avoid damaging plants (leaf burn) under the following circumstances: Add FPJ when using more than three different natural farming inputs combined, It is applied during hot weather, FPJ that has been stored longer than a year and thus has become more concentrated is being used. Apply FPJ once per week in the late afternoon, ideally an hour before sunset The solution can be foliar sprayed on leafs or watered into the soil. The nutrient solution is applied once per week and is adjusted as the plant passes through its life-cycle stages and vegetative and reproductive phases. Dilution Rates: 1:500 Water volume Kitchen measuring utensils Fluid ounces (fl oz) Milliliters (ml) ½ gallon 3/42 teaspoon (tsp) .13 4 1 gallon 1 1/2 tsp .26 8 5 gallons 2 1/2 tablespoons (Tbsp) 1.28 38 10 gallons 5 tablespoons (Tbsp) 2.56 76 25 gallons Little more than 3/4 cup 6.40 189 50 gallons 1 cup 12.80 379 Dilution Rates: 1:800 Water volume Kitchen measuring utensils Fluid ounces (fl oz) Milliliters (ml) ½ gallon 1/2 teaspoon (tsp) 0.08 2.5 1 gallon 1 tsp 0.13 5 5 gallons 5 teaspoon (tsp) 0.80 24 10 gallons little less than 1/4 cup 1.60 47 25 gallons 1/2 cup 4 118 50 gallons 1 cup 8 237 Dilution Rates: 1:1,000 Water volume Kitchen measuring utensils Fluid ounces (fl oz) Milliliters (ml) ½ gallon 1/3 teaspoon (tsp) 0.06 2 1 gallon 3/4 tsp 0.13 4 5 gallons 1 1/4 tablespoons (Tbsp) 0.64 19 10 gallons 2 1/2 Tbsp 1.28 38 25 gallons little less than 1/2 cup 3.2 95 50 gallons little more than 3/4 cup 6.4 189 WHEN TO USE FPJ Germination to early vegetative growth examples: Mugwort, Dropwort, and bamboo shoots FPJs are suitable at this stage to help crops become resistant against cold and grow fast and strong and is applied from germination until early stages of plant growth. FPJs should be used at lower concentration during this stage, preferably at a dilution of 1:1000. Vegetative growth examples: Kudzu, Arrowroot, Beans, Angelica, Dropwort. Purslane, Squash shoots, Sweet potato shoots, Watercress and Bamboo shoots as well as Reeds (water or marsh plants with a firm stem), help crops obtain their needed nitrogen to increase in volume. At this stage, FPJs can be used at a general dilution of 1:900 to 1:700. Beginning flower/fruiting: FPJ made from green (unripe) fruit is applied to plants that are just beginning to develop flower shoots and need phosphorus (P). At this stage, FPs can be used at a general dilution of 1:600. Reproductive and flowering and fruiting stage: They require a lot of calcium (Ca). FPJ made from calcium-rich plants or FPJ that has been stored for over a year is applied at this stage. At this stage, FPJs can be used at a general dilution of 1:500. Presence of pests: FPJ can be used to keep pests away from fruits. A mixture of FPJ and rice bran can be sprinkled on the area around fruit trees to lure pests to the ground, thus preventing them from going to the fruits. FPJ can be used at a general dilution of 1:500. WHEN NOT TO USE FPJ During excessive vegetative growth or overgrowth due to prolonged rains or cloudy weather. During acidic or nitrogen-excessive crop conditions, which create a pest-attractive environment. Conditions of too much moisture or poor ventilation, which promotes fungal growth. Only use citrus with citrus plants. Tips and special notes: It is not recommendable to use molasses as it contains too much moisture to raise the osmotic pressure as high as brown sugar does for good fermentation. Sometimes small bubbles or fungi will be present in the Jar. They result from lacking brown sugar or from an unbalanced volume between the empty space and the ingredient. In this case, add a little brown sugar, stir and preserve after filtering. Avoid picking plants near the road side to prevent the polluted plants. The most important requirement when selecting plants for making FPJ is to use the growing tips of plant species that are fast growers. Flowers, flower buds, and immature fruits can also be used. The plants should be vigorously growing at the time of collection. Hard or woody plant parts will yield little or no plant juice. Plant parts should be harvested while the plants are in respiration mode (before sunrise) and not in photosynthetic mode (during daylight), due to the effects these processes have on plant chemistry. Avoid collecting plant parts during or after rainfall (ideally, wait two sunny days after rain stops) and do not rinse collected plant parts, to conserve their surface microbial populations (lactic acid-producing bacteria and yeasts), which will carry out the fermentation process. Low levels of these microbes will result in improper fermentation and/or low yields of plant juice. Bonus Fermentation Fun by Chris Trump Credits Cho's Global Natural Farming Master Cho Chris Trump Alika Atay OneDrive The University of Hawaii School of Life Natural Farming Inputs Introduction to Natural Farming LAB - Lactic Acid Bacteria FPJ - Fermented plant juice Seawater, Fermented Seawater, Bio Mineral Water Vinegar OHN - Oriental Herbal Nutrient WCA - Water Soluble Calcium WCAP - Water Soluble Calcium Phosphate FFJ - Fermented Fruit Juice FAA - Fish Amino Acids S.E.S. - Seed and Seedling Treatment IMO to IMO2 IMO 3 IMO 4 & Liquid IMO IMO 5 ~Cultural Healing and Life
-
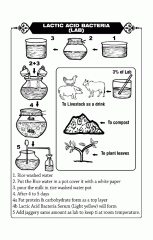
From the album: Hempyfan
-
Natural Farming Inputs Introduction to Natural Farming LAB - Lactic Acid Bacteria FPJ - Fermented plant juice Seawater, Fermented Seawater, Bio Mineral Water Vinegar OHN - Oriental Herbal Nutrient WCA - Water Soluble Calcium WCAP - Water Soluble Calcium Phosphate FFJ - Fermented Fruit Juice FAA - Fish Amino Acids S.E.S. - Seed and Seedling Treatment IMO to IMO2 IMO 3 IMO 4 & Liquid IMO IMO 5 Preserving bacterial based inputs Input - Section 1 - LAB or Lactic acid bacteria LAB is one of the easiest inputs to make and I consider it a great start in learning to make natural farming inputs. Its uses are wide ranging and can be typically within 5 to 7 days total processing and it can be finished for either refrigerated storage or room temperature storage. I invite you to learn more about this easy to make product and put the power of nature of nature and bring the power of a natural probiotic for plants and super composting aid for soils and medias that give you a gardening superpower. Updated/Added to this section on 6/22/20 - Non Animal Product LAB Recipe. I have not realized I had not presented a non dairy alternative to making LACTO. Today is a good day as that error has been corrected. I will try to do better in the future but this tutorial is so good it is certainly a better late than never addition. We warmly and eagerly consider all input to any section. My deepest respects to Fabio from Italy for bringing this to our attention. Making Probiotics /Lacto without "Whey" "No Dairy" I highly recommend viewing each of the following two videos and clicking the links below for the manual and the applications links at a minimum. Healthy Roots and Strong Wings Recipe for "Advanced Technique" as shown in the video above. To Make 6 Liter / 1.5 gallon bottle: Organic Brown Rice 600g / 4-cups, Organic Sea Salt 60g / 1/4 cup, Organic Brown Sugar 180g / 3/4 cups, (Mineral) Water 6000ml 1.5 gallons. To Make 1,5 Liter bottle / 50/51 ounces / 6.3 cups / .4 gallon Organic Brown Rice 150g / 3/4 cup Organic Sea Salt 15g / 2.5 teaspoons Organic Brown Sugar 45g / 1/4 cup Mineral Water 1500ml / 50/51 ounces / 6.3 cups / .4 gallon Some tools you will need: A wide funnel measuring cups or a kitchen scale PH paper (not necessary but still nice) To continue brewing after your LACTO Probiotics are done: You can use the same rice that you have used if you just ad the following ingredients: For 6 Liter bottle: Add half of the original amount of salt - 30 grams (in stead of the original 60gr) Add 2/3 of the original amount of sugar - 120 grams (in stead of the original 180) Add clean pure water as before For 1,5 Liter bottle: Add half of the original amount of salt - 7.5 grams (in stead of the original 15gr) Add 2/3 of the original amount of sugar - 30 grams (in stead of the original 45) Add clean pure water as before Additional wealth of shared knowledge from Healty Roots and Strong Wings There also is a blogpost about this tutorial on their website: For further direct discussion on their tutorial. Healthy Roots and Strong Wings For more information on this great and easy product to enhance your life and others please check the official LACTO-LIFE website: Lacto-life Click this link to go straight to the "LACTO-LIFE MANUAL": This is a must see step by step with graphics and instructions. Lacto Manual Applications for Lacto. Lacto Applications and Uses Bonus Video Lacto-Life I, JJ the Gardener personally like this process and will begin to use this in my next lacto creation. I specifically like how this process allows the gardener to reuse the rice over and over with additional inputs at lower levels for around 10 times. I do not know how it could get any more inexpensive and user friendly. Additionally, I intend to utilize this in place I would use fermented water or sea water. I can see this is an easy to use in a foliar spray method to assist in brix management in some situations/crops. Please, if you find this information helpful and you wish to contribute in a monetary or other ways to the video. Please use the links associated above to contribute directly to the video creator. We are not connected. The Following is LACTO made with Dairy Products. It is my pleasure that I welcome the instruction of Chris Trump as he has effective teaching skills that I feels does it best. If he has helped you please support Chris Trump directly as he is not associated with this compilation. https://www.patreon.com/christrump - Korean Natural Farming How to : LAB - https://www.patreon.com/christrump :22 - Preparing rice water. :40 - Preparing container and starting process. 1:02 - Length to make and finishing signs. 1:35 - Benefits of Lab 2:02 - Adding milk & percent to mix (1 to 10 parts of milk ratio) 2:58 - Readying jar and finishing time 3:23 - 48 Hour later and lab serum is ready to be separated 3:49 - Uses of curds - - Click for cheese video from Chris. 4:02 - Tools to separate and the processing of lab serum from curds 8:10 - Storage of LAB for refrigerator and for room temperature storage. This is an outstanding and highly instructional video on Lactobacillus by OneDrive, click below to see at youtube. University of Hawaii PDF on LAB This LAB recipe is from Master Cho, click to visit his site Lactic acid bacteria are anaerobic microorganisms. In the absence of oxygen, they break sugar into lactic acid. LAB is very effective in improving ventilation of air in the soil, promoting rapid growth of fruit trees and leaf vegetables. Materials / ingredients needed Rice-washed water Milk (unprocessed and not boiled) Jagerry / Brown sugar Clay jar / glass jar Porous paper (paper towel) Rubber band / thread HOW TO MAKE LAB FROM MILK ? Put rice-washed water 15 to 20 cm deep in a jar. Cover the mouth of the jar with handmade paper and leave in shade. Lactic acid bacteria will propagate at 23 to 25 C, and the solution will start to smell sour. Add this rice water to milk. The ideal ratio between milk and rice water is 3:1 ratio. Milk in the market pasteurized in low temperature is okay. But sometimes, milk brought from the stores will not be effective. The best milk to be used is the milk from cows. Since milk has more nutrients than the rice-washed water, lactic acid bacteria will grow vigorously. In 3 to 4 days, the jar will have three divided layers a) floating matter b) clear liquid and c) debris (waste). Starch, protein and fat will float on the surface and yellow liquid will be deposited at the middle, this is called as Lactic acid bacteria .The waste will be deposited in the bottom of the container. Remove the floating substance, strain and save the yellow liquid and store in a separate bottle and keep in cool and shaded place or in a refrigerator. HOW TO USE LAB ? The basic dilution ratio is 1:1000. LAB reinforces the ability of anabolism of microbes living on the plant stem and leaf, a condition that arose from the abuse of insecticides and fungicides. When using LAB alone, it is more effective to use it with FPJs. Fields will recover fertility and the soil will become soft and fluffy if IMO mixed with LAB is sprayed on the field. Use LAB (1:500) with FPJ (1:300) as drinking water for livestock, to recover their digestive function. LAB is extremely effective in making fruits and leaves large, but the amount of LAB used should be reduced while approaching the later stages. If the LAB is used together with mixed compost or IMO, the fermentation process occurs fast, leading to very effective results. The LAB function is to prevent the fermented mixed compost from decaying. USES OF LAB The Lactic Acid Bacteria (LAB) is very effective for improving soil ventilation and for growing fruits and leafy vegetables. The initial growth of the plant, when LAB is used during the vegetative growth period of fruiting vegetables, higher quality plants will result, and may be kept for longer periods, in storage. LAB increases the solubility of the fertilizer. LAB can reduce damage from gas through neutralizing ammonia gas produced where the immature compost is applied. LAB is conditionally anaerobic, so they can also survive with oxygen. LAB is resistant to high temperatures. LAB is strong sterilizer. LAB is used to culture IMO-3. LAB solubilizes phosphate in 100-200 ppm (parts per million) (100-200ml of LAB in 1000ml of water). Using LAB in phosphate-accumulated soil will increase its capacity to absorb the insoluble form of phosphates and help overcome the saline disorder as a result of decomposition of the phosphates. LAB has power to resistance to some fungi. HOW TO STORE LAB ? Keep the refined LAB serum at cool temperature, so for longer period where there is temperature change (1-15°C ). No storage under direct sunlight. In order to keep LAB at a normal temperature it must be mixed with the same amount of brown sugar and stirred with a wooden stick (ladle). Note: Using rice-washed water in obtaining lactic acid bacteria is to collect stronger ones. Only strong ones can survive in poor nutrients condition like rice washed water. Another excellent LAB making video The following videos below are from Good Karma Aquaponic - Click icon to visit their site and support them direct. How to make EM-1 Lactobacillus Serum "AKA" LABS part 1 Good-Karma Aquaponics - How to make EM-1 Lactobacillus Serum "AKA" LABS part 1 How to make EM-1 Lactobacillus Serum part 2 Good-Karma Aquaponics - How to make EM-1 Lactobacillus Serum part 2 How to make EM-1 Lactobacillus Serum part 3 Good-Karma Aquaponics - How to make EM-1 Lactobacillus Serum part 3 http://www.cgnfindia.com/images/posters/naturalfarming/thumbnails/poster-004.jpg I hope you find LAB useful and we would love to hear of your experiences, good and bad as in that we all learn a bit more! I also hope that this is a rewarding step for those new to natural farming inputs and leads to more. Motivational Thanks While I have promoted the person, organization and company that made these videos and information available this enterprise is not for profiting and is made as a labor of love and thus I ask if desired that you support them directly. I list them like this out of respect. ~ Cultural Healing and Life The motivation to write this was from a guy who fishes who asked some natural farming questions, for this I thank him as it was needed and kept putting off! ~ Cultural Healing and Life A song for you! Credits Cho's Global Natural Farming Master Cho Lacto-Life Healthy Roots and Strong Wings Chris Trump Good-Karma Aquaponics OneDrive University of Hawaii Grace Vanderwaal & America's Got Talent Natural Farming Inputs Introduction to Natural Farming LAB - Lactic Acid Bacteria FPJ - Fermented plant juice Seawater, Fermented Seawater, Bio Mineral Water Vinegar OHN - Oriental Herbal Nutrient WCA - Water Soluble Calcium WCAP - Water Soluble Calcium Phosphate FFJ - Fermented Fruit Juice FAA - Fish Amino Acids S.E.S. - Seed and Seedling Treatment IMO to IMO2 IMO 3 IMO 4 & Liquid IMO IMO 5 ~A Cultural Healing and Life Compilation
- 13 replies
-
- 1
-
-
- lab
- lactic acid bacteria
- (and 12 more)